
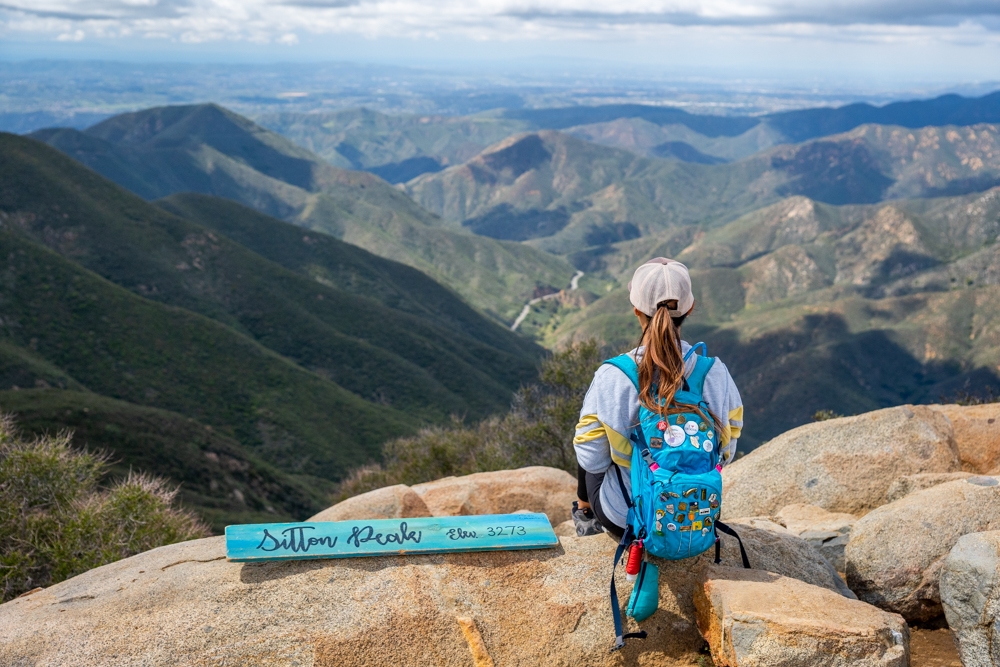
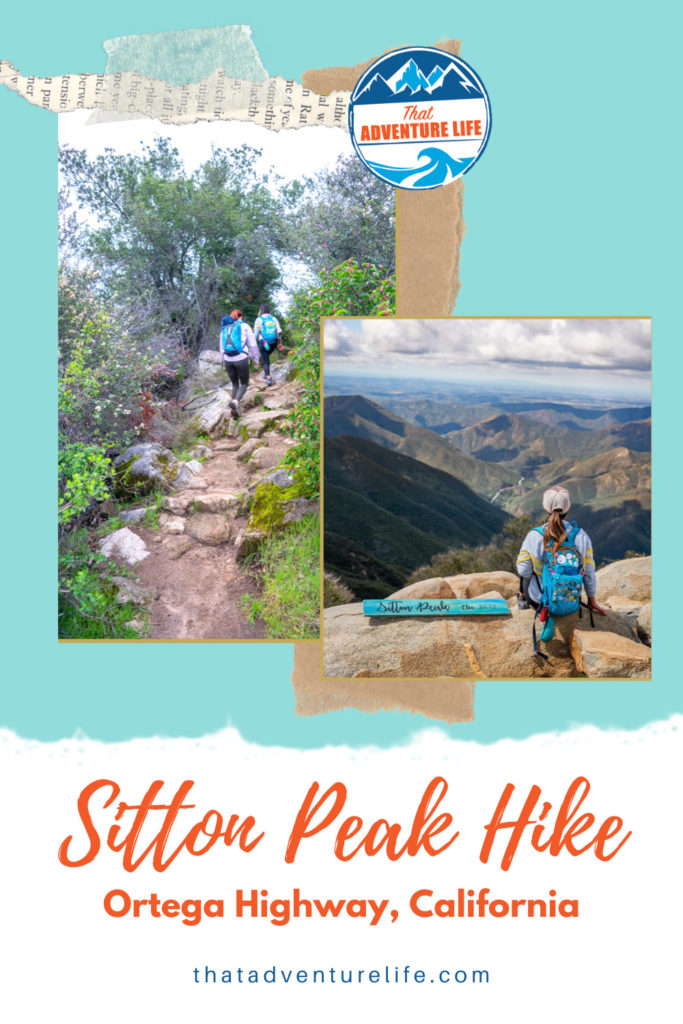
For quite some time now, we have toyed with the thought of taking on Southern California’s 6 Pack of Peaks Challenge. For those of you that don’t know what that is, it is a challenge for hikers to complete 6 out of 18 highest peaks in Southern California. Out of all the peaks, Sitton Peak Hike is one of the easier ones with the lowest elevation. At 3,273 feet above sea level, it gives hikers an expansive 360 views of the Santa Ana Mountains, Orange County, and San Diego County. On a clear day, you can actually see Catalina Islands from the peak. As we were waiting out the quarantine during COVID-19, our friend and Tough Mudder team mate Megan wanted to join us on a cool hike. Next thing we know, we were in front of the trailhead, ready to take on the challenge.
STATS:
Where:
Sitton Peak Trailhead (it is the same as Bear Canyon Trailhead)
33°36’44.9″N 117°25’35.7″W
Parking lot: 33°36’47.3″N 117°25’36.4″W
Sitton Peak: 33°35’15.1″N 117°26’46.2″W
Parking:
There is a decent-sized parking lot but it can fill up during peak hours. You can also park along the street. However, please make sure you pull all the way inside the shoulders and watch for incoming traffic.
Fees:
You need to purchase an adventure pass. These are available at the Ortega Oaks Candy Store (cash only), or at the El Cariso Ranger Station. Ortega Oaks Candy Store is right next to the trailhead. It is $5/day or $30/year.
Restrooms:
There are restrooms at the parking lot but not on the trail.
Hours:
The parking lot opens from 6 am – 7 pm
Distance:
9.8 miles
Elevation Gain:
2080 feet
Level:
90% of this trail is easy to intermediate. However, the final section to the peak is very steep and probably where the trail gets its hard rating. It is a 380ft gain in less than 0.5 miles.
Estimated Completion Time:
4.5 – 5 hours
Ideal Weather:
There are not a lot of shade along the trail so cool, dry days are the best. The trail can get muddy during rainy days.
Ideal Time:
Early mornings will give you cooler temperatures and a better chance of getting a parking spot. Unless you are an avid hiker, I wouldn’t do this hike in the summer. Spring, late Fall, and Winters are the best seasons for this hike.
Dog-friendly:
We saw a lot of pups out on the trails. Please make sure to clean up after them.
Video:
GETTING THERE:
One of the great things about Sitton Peak is its location. It is nestled amongst the twists and turns of the Ortega Highway that connect the Inland Empire to Orange County. This makes it fairly accessible to most Southern California residents. It is easy to find as well. All you have to do is keep your eyes peeled for the Ortega Oaks Candy store with its large rainbow-colored candy cane out front. The trailhead is right next to the candy store on the right-hand side. If you’re coming from Orange County side, the candy store and trailhead will be on your right.
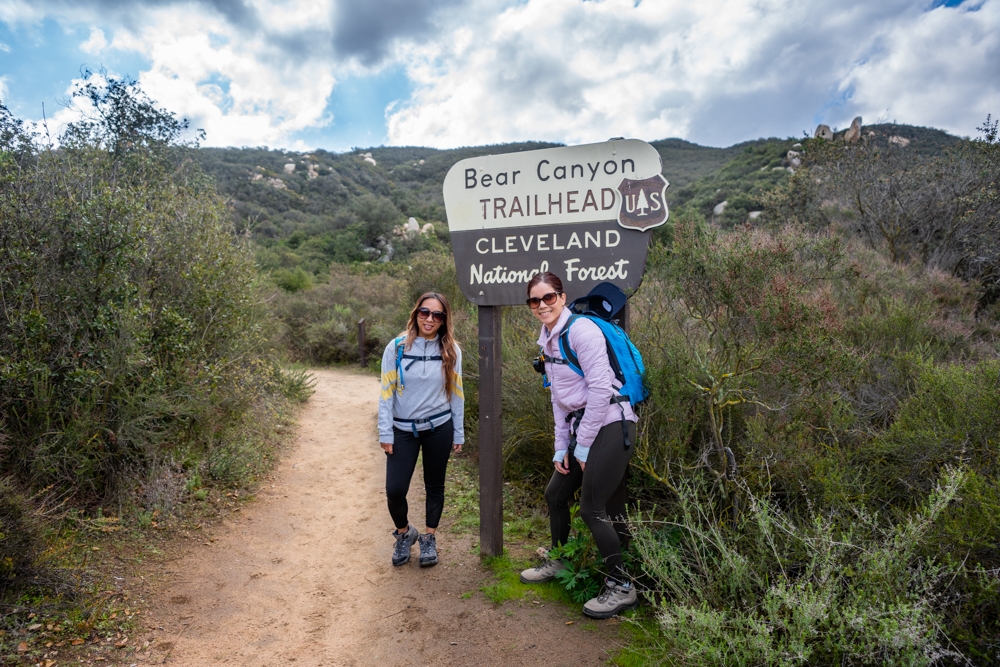
The official parking lot is located directly across from the candy store. You can also park along the road. If you do, please make sure to stay off the road and also pay attention to oncoming traffic. Sitton Peak trailhead is the same as the Bear Canyon trailhead.
THE ADVENTURE:
We started our hike quite early in the morning after picking up Megan, our Tough Mudder teammate. As early as we were, the parking lot was already filled up. There were also tons of cars parked along the road as well. There are many trails around this area so it wasn’t a surprise that the parking got full pretty fast. Please be careful when crossing the road. The Ortega Highway is a notorious road for race cars and street bikes. They can come through very fast sometimes.
The trailhead is quite easy to find. It is right next to the candy store. You won’t miss it because there is a big sign at the start that says “Bear Canyon trailhead”. The Sitton Peak hike shares the same beginning with the Bear Canyon trail. The hike is fairly straight forward with just a few turns. However, most of the trail is well-marked so if you pay attention, you won’t get lost.
Right after you pass the trail information sign and map, there is a metal sign-in box. This sign-in helps the county monitor trail use and plan trail maintenance. After we signed in, Megan excitedly headed up our first climb. Most of the climbs on this hike are quite manageable except for the last part. The trickiest part of the ones in the beginning, is working around a fair amount of erosion that is probably a result of the past couple of rainy years. This is a good trail if you want a good leg workout. There are several rock stairs that have been built into the trail.
About 0.9 miles in, we came up to the first road split of the trail. There is a small white sign there to point you in the right direction. You’ll want to make a right here to go toward Sitton Peak and 4 corners. There are lots of random rocks and large boulders on this trail. So, make sure to watch your step as you hike. At 2 miles, you’ll come across another road split. Again, make another right here to follow the sign for Bear Canyon Trail to 4 corners. I believe if you take the straight-ahead trail, it will also take you to the same destination. The important part here is to make sure you get to 4 corners. We followed the trail to the right this time.
The trail can be a bit deceiving. Part of it, you actually go downhill, just to climb back up a monstrous hill. Even so, it was enjoyable, especially if you go in the spring. There are tons of gorgeous wildflowers and wildlife for you to take your mind off the burning sensation that is running up your legs. It is at this point that you will get your first view of Sitton Peak as it towers off in the distance. At around 3.2 miles, you’ll reach 4 corners. This is where the trail split into 5 (yes, 5) different directions. Once again, you will make a hard right turn here toward Sitton Peak.


After making the right at 4 corners, the downhill break will come to an end and you will start climbing again. At first, it will be a rocky and narrow trail, but it eventually opens up to a nice wide maintained road. At the peak of this hill, you will find another marker that says .9 of a mile to Sitton peak. You are almost there! You will also be gifted with another nice downhill that will take you all the way to the main climb of the hike.
This section of the hike is somewhat the easiest part. It is because you go downhill for almost half a mile. We actually thought we were going the wrong way because of how long the downhill section was. Fortunately, we ran into a few hikers who assured us that we went the right way. At about 4.5 miles, Just past the large rusty metal tub, we reach a small little sign tucked away on the right-hand side. There is a small, steep trail right next to it. The sign has the words “Sitton Peak” written on it. From here, it is about 0.4 miles to our destination.
Because of how easy the hike had been so far, none of us were expecting how brutal this last section can be. There is a 380 ft elevation gain within the short 0.4 miles. The trail was also muddy in some spots and full of loose dirt and rocks. This section of the trail is small and not very well-marked. It also splits up in multiple areas and comes back together. The best way to go is to look for footprints, find the safest route for you, and keep heading toward to top of the peak. It was a little bit embarrassing as we were struggling to keep from sliding down when we saw this tiny pup fly down the hill like he was a little mountain goat. Inspire by the little guy, we pressed on toward the top.
Eventually, the trail levels out so that we can see the peak in front of us. Excitedly, we all ran toward it. It was a clear day when we went. From the top of the summit, we could see all the way to the ocean as well as an expansive 360 view of the surrounding mountains. It was such a gorgeous view and a rewarding end of this hike. There is a cute little sign at the top of the peak that you can also take a picture with. After taking in this breathtaking view, we headed back. It is the same way back as the way to the peak. If you have trekking poles, they will be very helpful in this section.
This is an out and back trail so you will just reverse the directions. Instead of all right turns at the spots, you will take lefts. Even though this wasn’t an incredibly difficult hike, the way back started to take a toll on our legs. Being almost completely downhill with several rocky staircases, our legs were on fire! One funny thing that I noticed is that the way back is a little more scenic. On the way to Sitton Peak, you are looking uphill almost the entire time. The plant life blocks your view most of the time. On the way back to the car, since you are now looking downhill, you can take in a lot more of the view. It is a nice little bonus way to celebrate your success.
This is a really nice hike and a great intro to hiking peaks if you are looking for a place to get started. After this hike, if you still want to do some more fun hikes, Mountain Woodson/Potato Chip Rock is another one on 6 Packs of Peaks list. A few other cool hikes with a decent distance are Eagle Rock in Warner Springs, Painted Canyon/Ladder Hike in Mecca, or Big Horn Mine in Wrightwood.
Happy Adventuring. Don’t forget to follow us on Instagram and sign up for our newsletter!
RECOMMEND GEAR:
Don’t forget to check out our Recommended Gear section as well.
• Hiking shoes
You definitely need hiking shoes for this, especially ones with good tractions. Vy’s shoes are Merrell Women’s Moab 2 Mid Waterproof Hiking Boot. Dustin’s shoes are TARGHEE III WATERPROOF.
• Snacks/Lunch
It is a long hike, make sure you bring enough snacks and/or lunches with you.
• Sunscreen:
Most of the trail is exposed. The sun can get very intense. PLEASE bring sunscreen. We use eco-friendly, reef-safe sunscreen, All Good Organic Sunscreen Butter – Zinc Oxide – Coral Reef Safe and All Good Sport Sunscreen Lotion – Coral Reef Safe (3 oz)(2-Pack) or Stream2Sea SPF 30 Reef Safe Sport Tinted Sunscreen.
• Water
Bring more than you think you need. It is a long hike. Vy uses the Camelback L.U.X.E. Dustin uses the Clik Small pack (sadly Clik is no longer around)
• Trekking Poles
Trekking poles will help with the steeper sections. We use TrailBuddy Lightweight Trekking Poles.
• Jacket
Depends on the season, it might get cold up there. We love our packable Patagonia Puff Jackets! You can get Vy’s version here, and Dustin’s version here
CAMERA GEAR:
• Camera:
Sony a7 III
Gopro Hero 7 Black
• Lenses:
Sony 24 -70mm f/2.8 Carl Zeiss Vario Sonnar T Zoom Lens
• Accessories:
GoPro The Handler Floating Hand Grip – Official GoPro Mount
Aluminum GoPro protection frame


4 Comments
Moses Mauga
What’s up So Cal, Just hiked this Hill on Saturday around or before 7am and 8am finished at 2pm in the afternoon told this was an easy course it was not I repeat it is not but thats from a rookie stand point, For my young hikers out there be mentally ready straight up bring the biggest water bottle you have man Before this Hike. But aside that this hike is a go to, What a view it is from up there better yet would I do it again Hell yeah.
By your fellow rookie
Moses Mauga
Vy
Definitely not for beginner hikers for sure! Glad you had a wonderful time!
Alice
Looks like an amazing place! You’ve inspired me to try out some local hiking trails near where I live! 🙂
Vy
That’s awesome Alice! We hope you get to see some amazing things out there! 😁