
As many hikes as we’ve done, Cathedral Rock hike surprisingly is one of our top favorite trails, even though it is only 1.3 miles roundtrip. Besides the gorgeous view on the top, this trail has so much personality to it. For such a short hike, it is quite challenging. However, it offers incredible, diverse views of the surrounding areas as well as many hidden, secret spots if you’re willing to explore. This is why Cathedral Rock hike is one of the best hikes in Sedona.
STATS:
Where:
Cathedral Rock hike trailhead/parking:
500 Back O Beyond Rd, Sedona, AZ 86336
34°49’30.6″N 111°47’19.1″W
Fee:
It is free if you have the Annual National Parks – America the Beautiful or Red Rock pass. Otherwise, it will cost $5 to park. You can pay using an automated machine at the trailhead. It only accepts credit cards.
Parking:
There are two small, paved parking lots in front of the trailhead. There are also a few parking spots along the road.
Restrooms:
There is a small restroom at the trailhead of Cathedral Rock hike.
Distance:
1.3 miles R.T.
Elevation Gain:
774 ft
Level:
Moderate with several difficult sections that required a lot of rock scrambling and near verticle climbing. If you’re afraid of height, this might not be for you.
Estimated Completion Time:
1-3 hours
Ideal Weather:
Sedona can get very warm. Falls and Springs are the best.
Ideal Time:
Go early for cooler temperature and parking. However, if you want to brave the crowd, the sunset here can be absolutely gorgeous. This is a popular trail, so if you can, go on a weekday. It will be way less people.
Pet-friendly:
You can bring dogs but they have to be on a leash.
Weather:
Note: This trail is not wheelchair accessible. Not recommended for individuals with balance issues. It requires a lot of rock scrambling and scaling a section that is almost vertical. I would not recommend any baby carriers either. (We’ve seen a few people turning back there).
VIDEO:
THE DRIVE
To get here, you can use the GPS coordinates above. From Uptown Sedona, you can take AZ-179 South going toward the Chapel of the Holy Cross. After you pass the traffic circle for the Chapel, follow the road for Back O Beyond Rd at the next traffic circle. The first parking lot for the trailhead should be on your left around 0.7 miles. This is where the trailhead starts. The second parking lot is right next to the first one.
THE ADVENTURE:
The start of the trail
We got to the trailhead around 7:30 am on a Saturday and the parking lot was almost full. As we pulled into one of the few spots left, there were people already getting back to their car. They must have got here before the sun rises. Go early if you want to attempt this hike! It gets VERY busy.
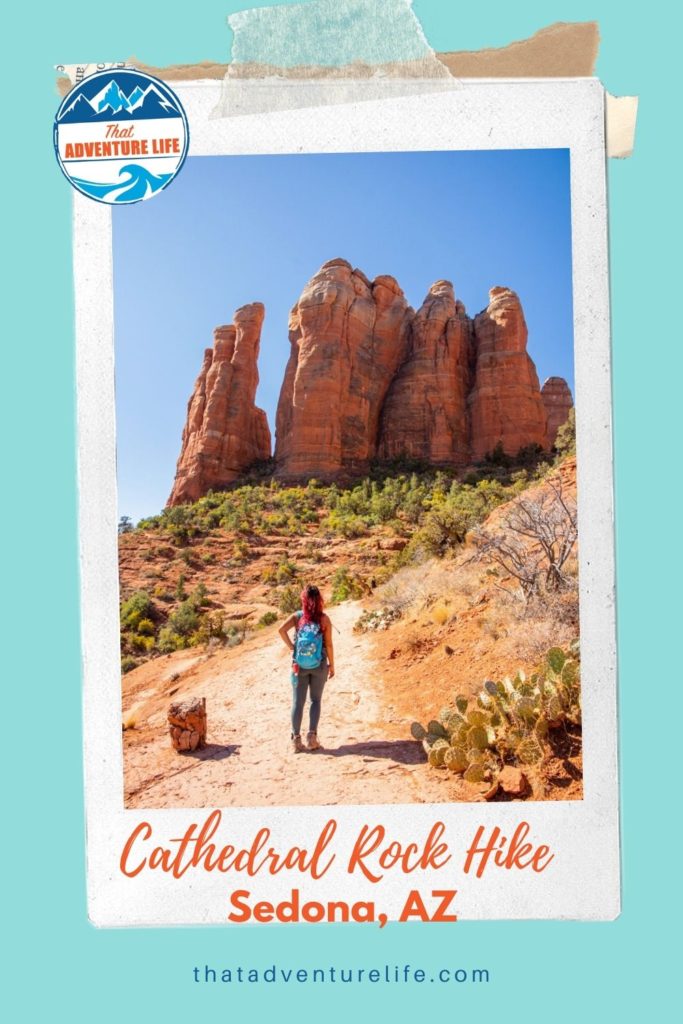
The trail to Cathedral Rock is quite straight forward and well marked. At the beginning of the trail, follow the sign for the Cathedral Rock trail. If you look straight forward, you can see the towering rock formation. That is where you want to go. There are a couple of spots along the way where the Cathedral Rock trail intersects with the Templeton Trail. As long as you go straight toward the rock formation and follow the rock cairns, you’ll be fine. There are signs at the crossing too, to help you out.


The trail starts out with a short, easy walk until you reach the start of your climb, Rock Face Section 1. From here, you can follow the cairns to climb up the rock face. In some sections, the rocks get smooth over time, so you won’t get a lot of traction. As my sister is not a very adventurous person, we found it best to pick the easiest route for us instead of following the rock cairns. It’s actually not as hard as it looks. Most of the time, there is enough texture in the sandstone to help you with tractions. Just make sure to be extra careful and take your time. As much as you focus on climbing up this rock face, don’t forget to look back and enjoy the view behind you. It is quite beautiful.


The most difficult section
Once you got on top of Rock Face Section 1, you’ll find yourself at the most difficult section of this hike. This is where a lot of people turn back. After a quick climb up the rock stairs, you’ll arrive at the base of a crevice (or cleft) in the rock. This crack is about 40ft long and sits at almost vertical. There is a lot of hand and footholds, which make the climb manageable. I’m not gonna lie, this section is tricky for your average hiker. Even with the footholds, climbing up this section requires jamming your foot into the crevice and inch your way up. There are a couple of flat sections where you can take a breath. Also, the rocks can be very slippery if it rains recently.


That said, if my sister can do it, you can too! It is a lot easier if you go with someone that can give you a hand. And the way down is actually surprisingly easier than going up. Also, before you climb, pay attention to where the footholds are so you know where you can place your hands and feet. We took our time with my sister and guided her up the cleft. Even though she is semi afraid of height, she did wonderfully! As for Dustin and I, we loved this section. Then again, we live for stuff like this. For us, this section gives Cathedral Rock hike its unique personality.
About 2/3 of the way up the crevice, at a semi-flat section, you’ll notice the trail split into 2 ways. You can either go straight up or make your way over to the right. We ended up going up through the right trail. I think it is a bit easier.


The rest of the hike
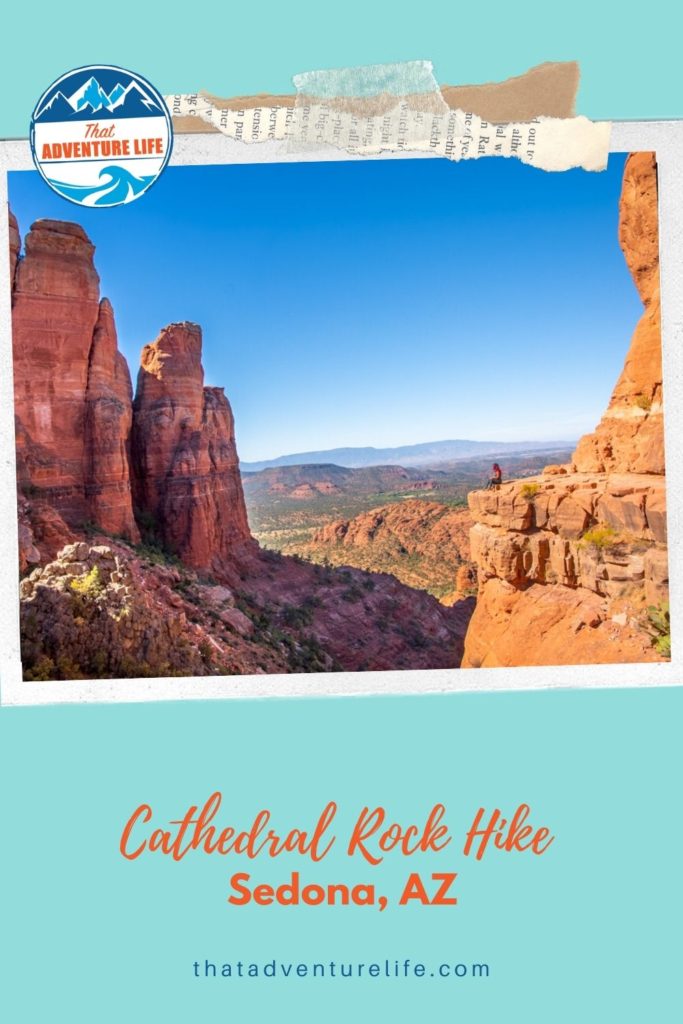
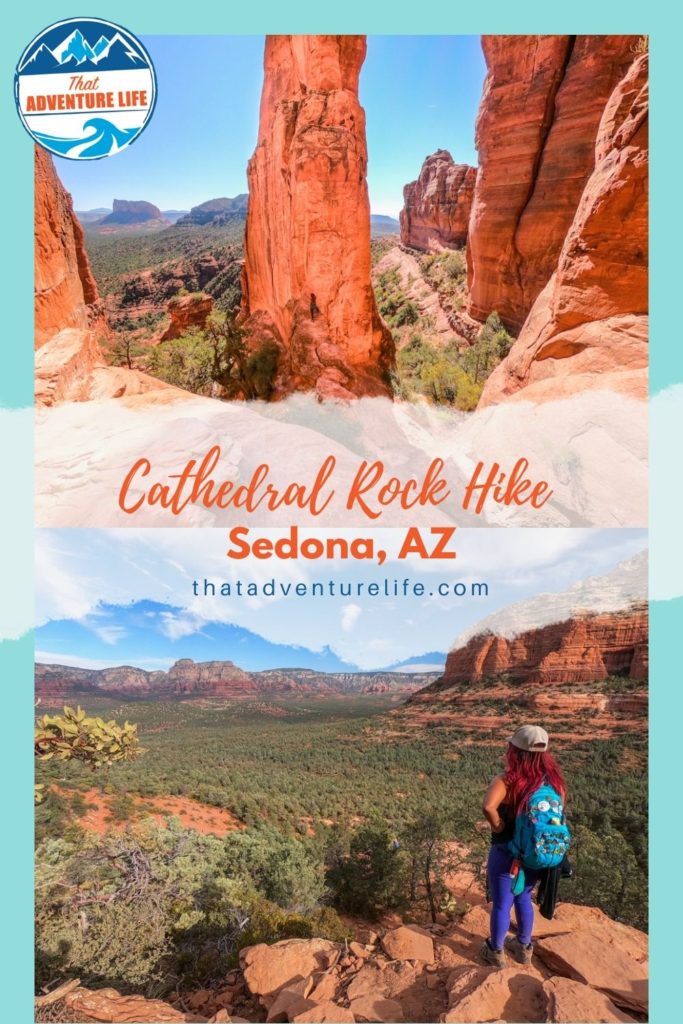
Once you reach the top of this crevice, there is a plateau with gorgeous views of the valley below and of the towering rock formations ahead. From here, the trail gets easier. However, you’re not quite done yet. There are still a few sections that required more scrambling up the steep, smooth rock face. Again, give yourself plenty of time and watch your steps. The trail eventually turns into a normal trail which then turns into rock stairs all the way to the top.


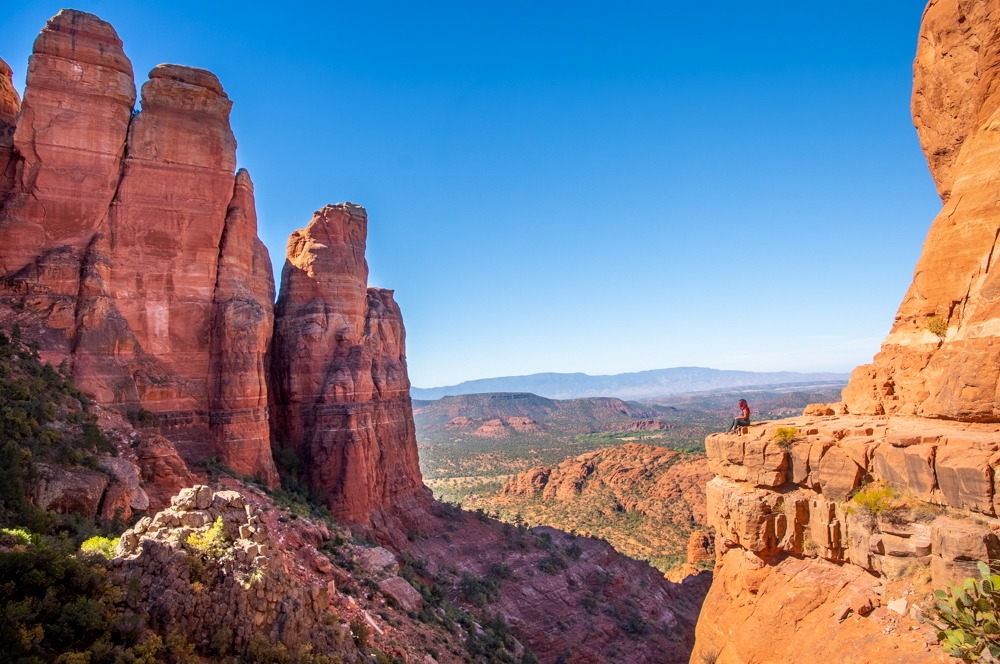
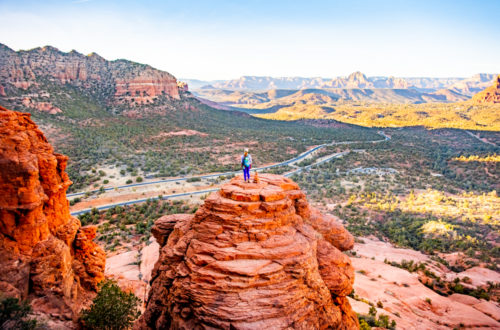
Once you reach the top, there is a sign that says “End of Trail”. That’s it, you’ve made it. The end of Cathedral Rock hike is a narrow plateau connecting the two towering mountains, with steep slopes on each side. The views on this plateau are incredible, doesn’t matter where you sit. If you go to the right of the plateau, there is a small ledge that you can go out on. This is where you can take the iconic photo of Cathedral Rock. This ledge is quite wide, so it’s not that scary unless you’re afraid of height.
Cathedral Rock is a well-known vortex spot in Sedona. Supposedly, vortexes are places where the earth seems especially alive with energy. People believe you can feel inspired, recharged, or uplifted after visiting a vortex. An interesting thing we found is that this spot has a lot of electromagnetic interference. Whether you believe in vortexes or not, the views from up here are simply magical. So take your time to soak in all the beauty and energy from Mother Nature.


Secret trail and the way back
If you’re up for it, at the “End of the Trail” sign, go left and keep going, follow a faint trail that curves around the mountainside. The trail turns rocky which requires a short scrambling. It’s not that bad. Once you’re up here, you’ll get another incredible view that many people won’t know about. It can get quite windy up here.
Once you’re done, go back to the way you came from. If you come for the sunset, make sure to bring a headlight. It can get very dark here in Sedona. During the steeper section, it’s okay to sit down on your butt and slide down. Trust me, it is A LOT safer and easier.


Despite how much my sister was complaining about the hike up, she actually said this is her favorite hike of our entire trip. And I agree with her. If you’re still up for more hiking, check out Devil’s Bridge. Birthing Cave is another cool short hike. Don’t forget to check out the famous Pink Jeep off-road tour while you’re in Sedona. We did the Broken Arrow tour and it was such a blast!
Happy Adventuring. Don’t forget to follow us on Instagram, subscribe to our Youtube channel, and sign up for our newsletter!
RECOMMEND GEAR:
These are the gear that we personally use and find them helpful for this particular adventure. Don’t forget to check out our Recommended Gear section as well.
The majority of these links are through our affiliate links so if you buy something, it is at no extra cost for you but it helps us support the site. That being said, don’t buy something just to support us, buy something if you think it will enhance your travels and adventures.
• Hiking shoes
You need good traction hiking shoes! You will need to climb on almost vertical boulders. Some sections can be slippery. Vy’s shoes are Merrell Women’s Moab 2 Mid Waterproof Hiking Boot. Dustin’s shoes are TARGHEE III WATERPROOF.
• Snacks/Lunch
Depends on how long you want to stay up here, it is a nice place for a quick lunch.
• Sunscreen
The trail can get very warm. Bring sunscreen! We use eco-friendly, reef-safe sunscreen, All Good Organic Sunscreen Butter – Zinc Oxide – Coral Reef Safe, and All Good Sport Sunscreen Lotion – Coral Reef Safe (3 oz)(2-Pack) or Stream2Sea SPF 30 Reef Safe Sport Tinted Sunscreen.
• Water
The trail can get very warm! Bring lots of water. Especially if you go in the afternoon. Vy uses the Camelback L.U.X.E. Dustin uses the Clik Small pack (sadly Clik is no longer around). Patagonia Women’s Nine Trails Pack 18L is also a great backpack for a shorter hike like this.
• Jacket
If you get there early in the morning or go during the winter, it might get a bit chilly. We love our packable Patagonia Puff Jackets! It can keep you warm, yet pack up super light. You can get Vy’s version here, and Dustin’s version here. If you want some lighter, we love the packable Patagonia Women’s Houdini® Jacket and Patagonia Men’s Houdini® Jacket
• Headlights
If you’re attempting this hike for either sunset or sunrise, make sure to bring a headlight. We both used the Black Diamond Cosmo.
CAMERA GEAR:
• Camera:
Sony a7 III
Gopro Hero 7 Black
• Lenses:
Sony 24 -70mm f/2.8 Carl Zeiss Vario Sonnar T Zoom Lens
• Accessories:
GoPro The Handler Floating Hand Grip – Official GoPro Mount
Aluminum GoPro protection frame
SandMarc Extended GoPro Pole
Hybrid Pro Filters – DSLR / Mirrorless
Cinema CPL Filter – HERO 9


One Comment
Vitaliy Gershfeld
This blog and your YouTube channel has been a major reason I’ve been able to find hikes like this so thank you for that! Regarding Cathedral Rock, what a trail this is! I did it in January and was fortunate because so few people were there and I found parking on my first try. The sunset views were incredible and I noticed in the photos you put up, you also show the 3 pillars next to it. Maybe it’s just me, but I found that very few people actually explored that specific spot and mostly focused on the actual Cathedral Rock summit. Was this also the case for you?