
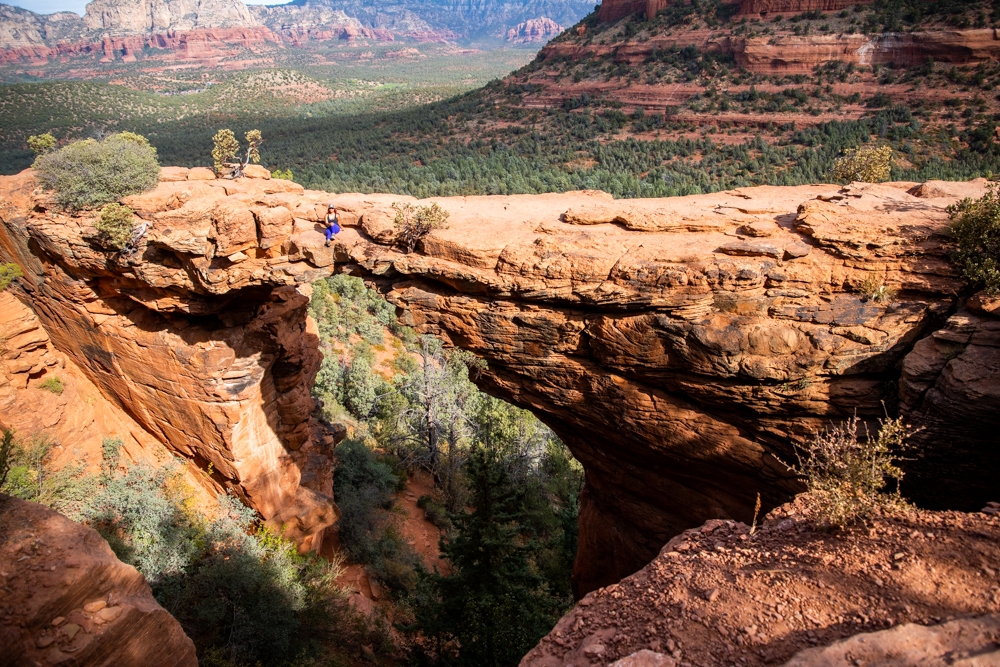
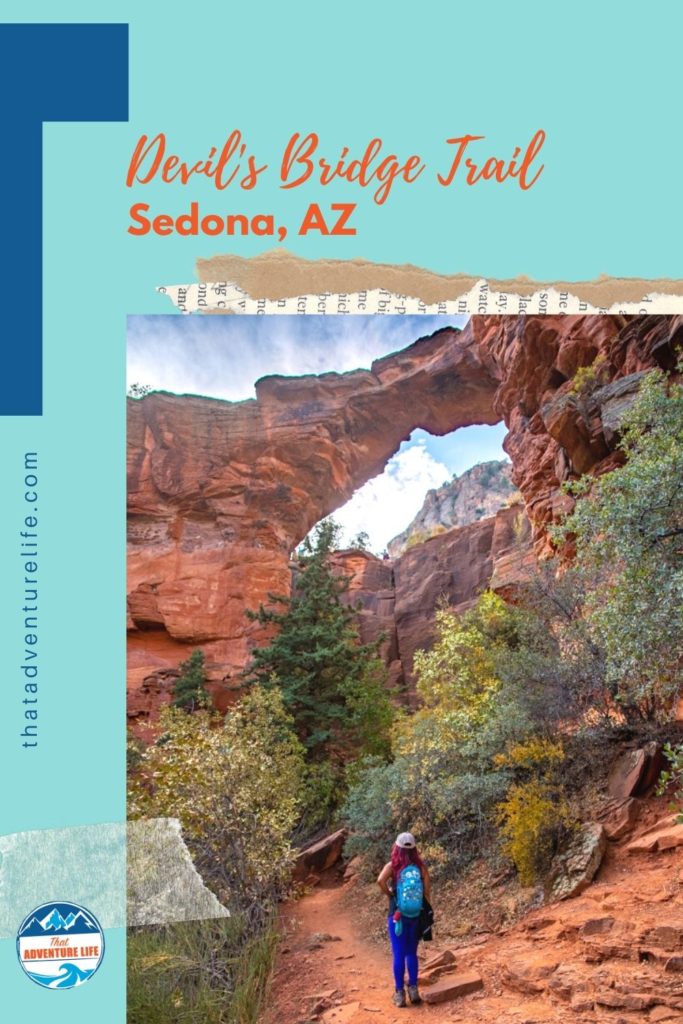
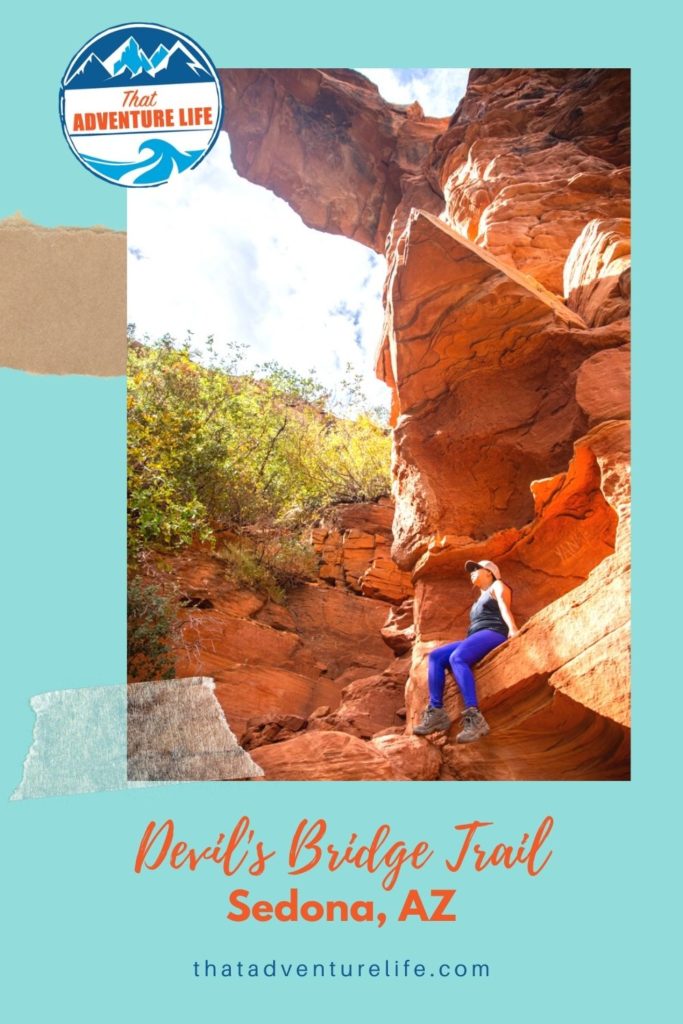
Being one of the most iconic hikes in Sedona, Arizona, Devil’s Bridge trail will take you to the largest natural sandstone arch in the area. This arch is 54 ft tall, 45 ft long, and about 5 ft in width. Despite its name, Devil’s Bridge is breathtakingly beautiful. It is the reason why this trail is also very popular. We’ve done this trail 6 years ago, but we couldn’t get enough of it. Therefore, on our recent trip back to Sedona, we had to take my sister and her husband with us.
STATS:
Where:
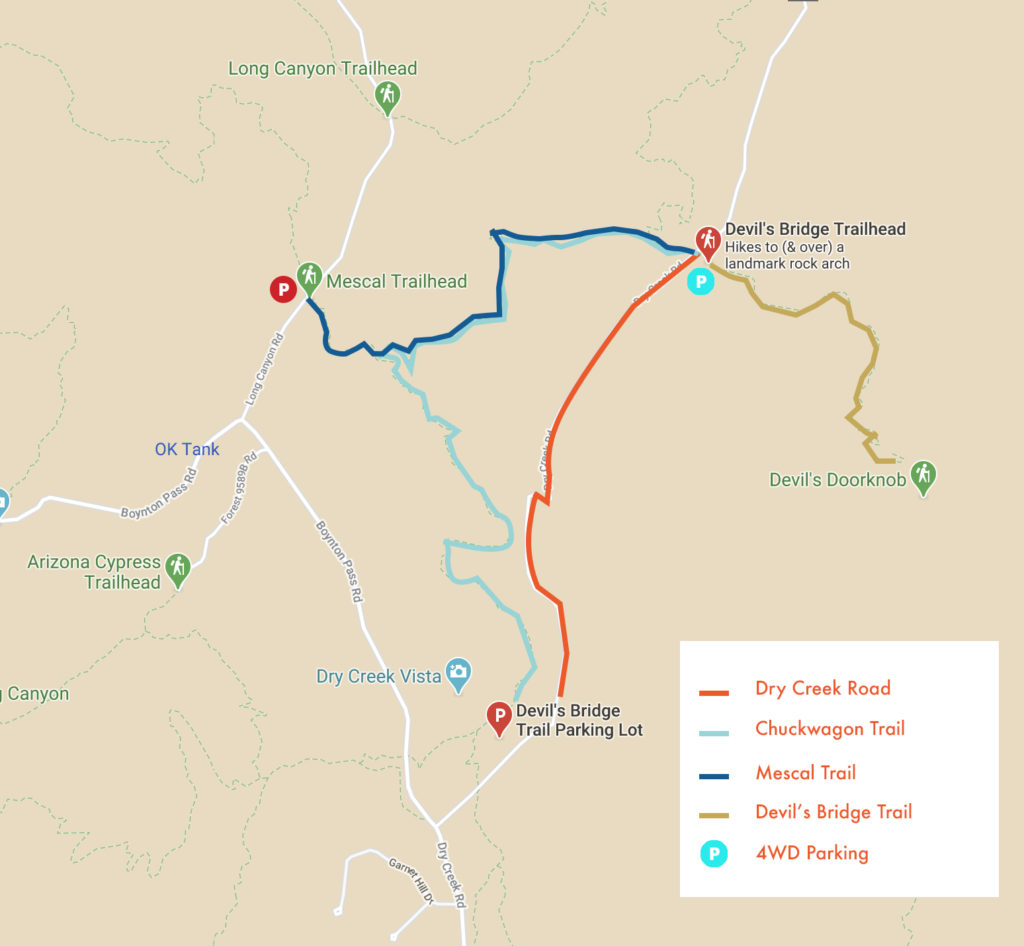
There are 3 different ways to get to Devil’s Bridge:
Chuckwagon Trailhead Parking Lot:
34°53’24.5″N 111°49’14.1″W
Mescal Trailhead Parking Lot:
34°54’06.5″N 111°49’36.2″W
Dry Creek Road
This way starts at the same parking lot as the Chuckwagon trail.
Fee:
If you park at the Dry Creek Road/Chuckwagon trail parking lot, you will need a $5 Red Rock Pass. If you drive to Devil’s Bridge trailhead or use the Mescal trail, you don’t need the Red Rock Pass.
Parking:
Chuckwagon Trail and Dry Creek road parking is a decent size paved lot. Mescal trail parking is a small dirt parking on the side of the road.
Restrooms:
There is a primitive restroom at the trailhead for Chuckwagon and Dry Creek Road. None for Mescal trail.
Distance:
Chuckwagon Trail: 5.8 miles round trip
Mescal Trail: 4.2 miles round trip
Dry Creek Road: 4.4 miles round trip
From Devil’s Bridge Trailhead: 2 miles round trip
Elevation Gain:
Approximately about 500ft elevation, doesn’t matter which route you take.
Level:
Easy with a couple sections of rock stairs and scrambling.
Estimated Completion Time:
1-3 hours
Ideal Weather:
Sedona can get very warm. Falls and Springs are the best. There might be snow on the trail, which can be slippery.
Ideal Time:
As early as you can in the morning for cooler temperature and parking. This trail can get VERY busy by 7 am.
Pet-friendly:
You can bring dogs but they have to be on a leash.
Weather:
VIDEO:
HOW TO GET TO DEVIL’S BRIDGE
There are a few ways to get to Devil’s Bridge. You can either drive to the Devil’s Bridge trailhead or hike there.
Driving
If you have a 4WD vehicle with high clearance, you can drive to the Devil’s Bridge trailhead. From here, it is 2 miles R.T. to go to Devil’s Bridge and back. You start from the parking lot at the beginning of Dry Creek Road and take a very rocky dirt road for about 1.3 miles. This road might be closed in the winter. There is a very small, dirt parking lot at the end, before the trailhead.
Hiking
In the winter, when the 4WD road is closed, if you don’t have 4WDs or you simply want to get that extra mile hike in, there are 3 different ways to hike to Devil’s Bridge trailhead. Once you get to Devil’s Bridge trailhead, you can read here for the rest of the hike.
Dry Creek Road to Devil’s Bridge trailhead:
If you want the easiest and most straightforward route, this is the one. It is also the most popular one. After you park at the parking lot on Dry Creek Road, you pretty much just walk along that dirt road to go to Devil’s Bridge trailhead. It is not very scenic but it is mostly flat until you reach the 4WD parking lot at 1.3 miles in. Make sure to watch out for cars.
Chuckwagon trail to Devil’s Bridge trailhead:
This one also starts at the parking lot on Dry Creek Road. Instead of walking along Dry Creek dirt road, you head toward the back of the parking lot to follow the signs for Chuckwagon trail. This one is the longest option but it is beautiful. The trail is well marked.
Mescal trail through Chuckwagon to Devil’s Bridge trailhead:
This trail is our favorite option. Not only it is a shorter option, but it is very beautiful. For some reason, it is also the least popular. Therefore, you can have to the whole hike mostly to yourself, until you reach the trail for Devil’s Bridge, of course. This also makes parking a bit easier to find. The trail is also well marked. We will talk about this option more below.
To get to this trailhead, drive past Dry Creek Road on Boynton Pass until you reach Long Canyon Road. Turn right on Long Canyon Road. The small dirt lot is about 800ft down the road, on the right-hand side.
FROM MESCAL TRAIL TO DEVIL’S BRIDGE
Mescal trailhead to Devil’s Bridge trailhead
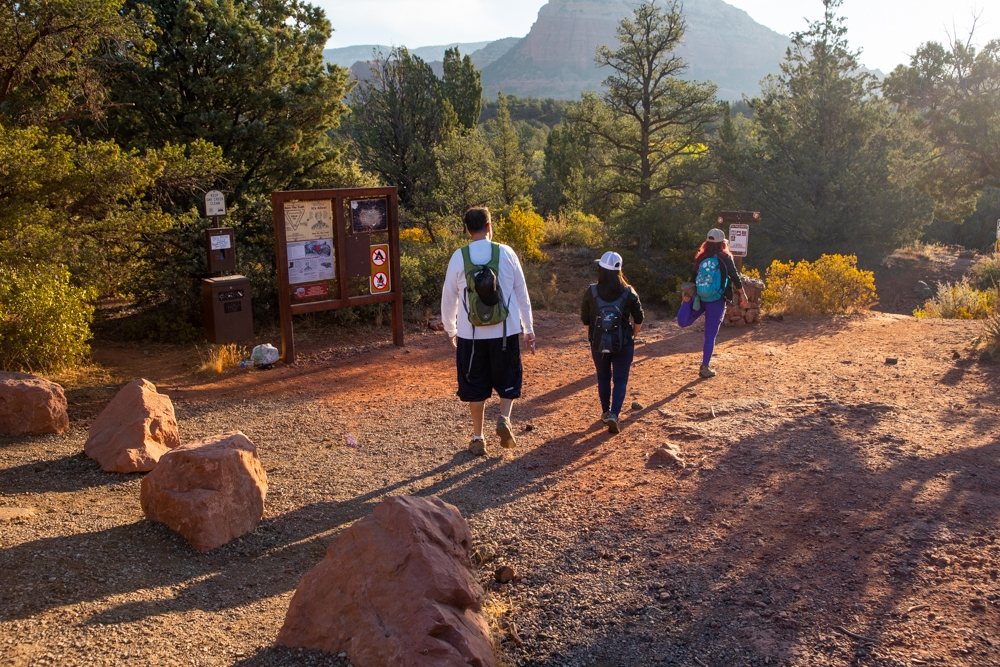
We drove past the parking lot at Dry Creek Roat at 7 in the morning and the place was already packed. There were cars parked along the road. Lucky for us, we wanted to hike through the Mescal trail instead. There were a few cars in front of the Mescal trailhead, however, there were plenty of parking spots left.
There is a big sign in front of the trailhead, pointing you in the right direction. The weather was perfect as we embarked on our adventure. Even the trail is mostly flat, make sure to watch your steps. There are sneaky tree roots, loose rocks, and pokey cactuses all around. At 0.2 miles, you’ll come up to a fork with a sign pointing toward Devil’s Bridge. You want to follow the sign to the left. The trail winds through a green forest. It was particularly beautiful in the morning light. It seems to enhance the intensity of the red dirt, against the blue sky and green leaves.


At about 0.5 miles, you’ll reach a dry river bed consist of shales. Depends on the season, there will be some water there. This area is quite beautiful. At the end of the shale bed, there is another signpost, pointing you toward Devil’s Bridge trailhead.
From here, the trail opens up to gorgeous views all around. Breathtaking red mountain ranges are visible on all sides. This section of the hike is very beautiful, however, it also has minimal shades. At 1.15 miles, you’ll reach Dry Creek road. Once you cross over this dirt road, you’ll get to a small 4WD parking lot. This is where Devil’s Bridge trail starts.


Devil’s Bridge trailhead to Devil’s Bridge
This trail is beautiful since the start. It is wide but goes uphill immediately. There are a lot to see such as the looming mountain ranges, areas full of small rock stacks, and the incredible views of the vast valley below. Make sure to keep an eye out for turn-outs for these viewpoints.
As you go up further, the trail narrows down and eventually turn into a narrow rock staircase. Watch your steps on this staircase. The steps are narrow and uneven. Once you go up the staircase, you’ll come to a wide plateau with a breathtaking view of the surrounding areas. Make sure to take some time to enjoy this view before starting on the 2nd technical section of this hike.


From the plateau, there is another set of rock steps. This section is a bit more challenging. It requires a bit more scrambling as the steps are steeper and more uneven. There might be a traffic jam if you go on a busy day. Luckily, it is quite short. Once you get to the top, the trail even out. It is a straight shot to Devil’s Bridge. On a busier day, there’s usually a line of people waiting to get on the bridge for their iconic shot. Everyone seemed to be super nice and willing to help each other out to take their photos. If there is a line, please be patient and wait. Don’t be a bonehead and climb around the back and ruin everyone else’s photos.
The bridge itself is quite wide once you get on it. If you do decide to go on there, just make sure to watch your steps and be extra careful. It is a long way down. Also, if you’re going in the winter, be careful of black ice. It can be slippery.


Once you’re done spending time up here, you can make your way back the way you came from. If you want a little extra adventure, heads down the bottom of the bridge. It is a unique view, looking up at the bridge that you were just on. To get here, there is a small trail to the right at the bottom of the first set of stairs. Another note on your way back is to make sure to follow the sign for Chuckwagon trail once you hit the Dry Creek dirt road (going straight). There will be signs to lead you back to the Mescal trail parking lot.


We love this hike. It’s quick, easy but it has beautiful views! We definitely will do this again. If you’re here, go check out the secret Birthing Cave. It’s a short hike with a gorgeous view, and super close to Devil’s Bridge. Another awesome hike is Cathedral Rock. It is famous for a reason. Also, don’t forget to check out our off-roading tour with Pink Jeep Adventures.
Happy Adventuring. Don’t forget to follow us on Instagram, subscribe to our Youtube channel, and sign up for our newsletter!
RECOMMEND GEAR:
These are the gear that we personally use and find them helpful for this particular adventure. Don’t forget to check out our Recommended Gear section as well.
The majority of these links are through our affiliate links so if you buy something, it is at no extra cost for you but it helps us support the site. That being said, don’t buy something just to support us, buy something if you think it will enhance your travels and adventures.
• Hiking shoes
It’s an easy hike, however, some areas can be slippery. It’s good to wear your hiking shoes. Vy’s shoes are Merrell Women’s Moab 2 Mid Waterproof Hiking Boot. Dustin’s shoes are TARGHEE III WATERPROOF.
• Snacks
It is not a short hike, bring your snacks.
• Sunscreen
The trail can get very warm. Bring sunscreen! We use eco-friendly, reef-safe sunscreen, All Good Organic Sunscreen Butter – Zinc Oxide – Coral Reef Safe, and All Good Sport Sunscreen Lotion – Coral Reef Safe (3 oz)(2-Pack) or Stream2Sea SPF 30 Reef Safe Sport Tinted Sunscreen.
• Water
The trail can get very warm! Bring lots of water. Especially if you go in the afternoon. Vy uses the Camelback L.U.X.E. Dustin uses the Clik Small pack (sadly Clik is no longer around). Patagonia Women’s Nine Trails Pack 18L is also a great backpack for a shorter hike like this.
• Jacket
Depends on the season, it might get a bit chilly. We love our packable Patagonia Puff Jackets! It can keep you warm, yet pack up super light. You can get Vy’s version here, and Dustin’s version here. If you want some lighter, we love the packable Patagonia Women’s Houdini® Jacket and Patagonia Men’s Houdini® Jacket
CAMERA GEAR:
• Camera:
Sony a7 III
Gopro Hero 7 Black
• Lenses:
Sony 24 -70mm f/2.8 Carl Zeiss Vario Sonnar T Zoom Lens
• Accessories:
GoPro The Handler Floating Hand Grip – Official GoPro Mount
Aluminum GoPro protection frame
SandMarc Extended GoPro Pole
Hybrid Pro Filters – DSLR / Mirrorless
Cinema CPL Filter – HERO 9


2 Comments
Rachel
This hike looks super busy but also incredible! What time of year did you go? Also, you are insanely brave to sit right on the edge of the bridge like that. 🙂
Vy
Hey Rachel! This hike gets really busy! Only good thing about that is that you will always be able to find a stranger to take your pictures if you want to go out on the arch. We typically go around october because it isnt super hot.