
Birthing Cave is a sacred spot in Sedona, Arizona where women all over the place come in hope of getting pregnant or having a healthy pregnancy. Others think this place has healing power. It is a short and easy hike to get to the cave. And the trailhead is super close to Devil’s Bridge hike. Therefore, you probably can do both in one day. As we mentioned above, even though this place is in public land, IT IS SACRED! Please be quiet and respectful. DO NOT LEAVE ANY TRASH!
Special Note:
Birthing Cave is a public spot, where anyone can come and explore. We’re sharing directions because we believe everyone deserves equal access to information about the outdoor public space. However, we recognize that posts like these make lesser-known spots a lot more accessible, increasing the risk of trail misuse and overcrowding. This is why we’re hoping to educate others about how to enjoy these beautiful areas responsibly along with sharing tips on how they can access the area and participate in the activity safely.
STATS:
Where:
The trail starts at Long Canyon trailhead:
34°54’23.7″N 111°49’27.0″W
Actual Cave:
34°54’46.9″N 111°50’09.8″W
Fee:
It is free
Parking:
There is a small dirt lot on the side of the road, right in front of the trailhead.
Restrooms:
There is no restrooms
Distance:
2 miles R.T.
Elevation Gain:
400ft
Level:
Easy hike to the bottom of the cave. However, going up the cave requires scrambling on rock steps. These rock steps can get slippery.
Estimated Completion Time:
1-2 hours
Ideal Weather:
Sedona can get very warm. Falls and Springs are the best.
Ideal Time:
Go early for cooler temperature.
Pet-friendly:
You can bring dogs but they have to be on a leash.
Weather:
VIDEO:
THE DRIVE:
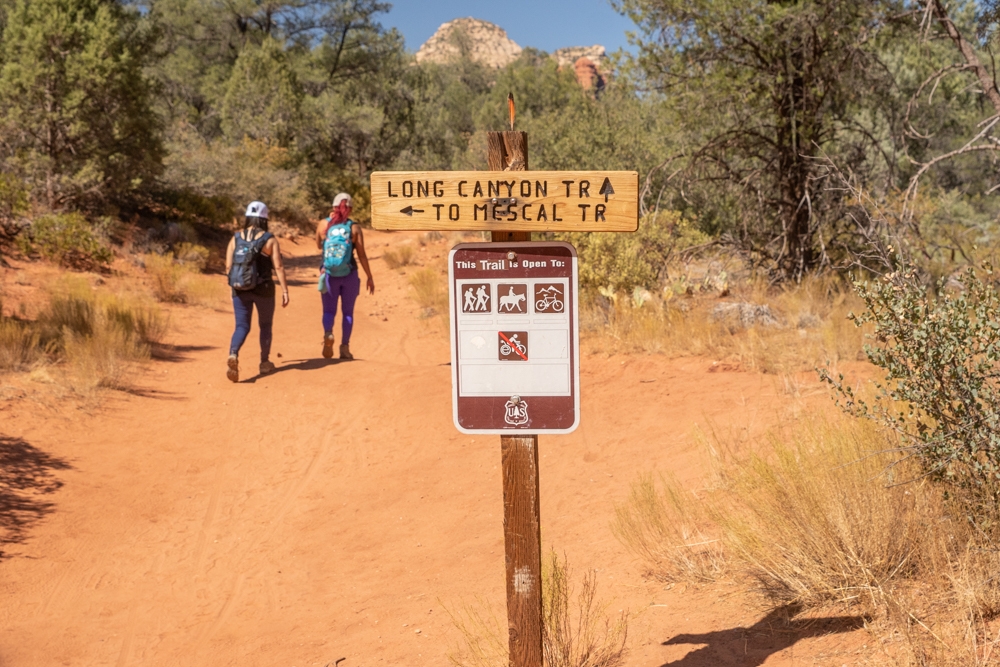
The birthing cave is an off-shoot trail from the Long Canyon trail. Therefore, you’ll want to start your hike at the Long Canyon trailhead. To get here, take Boynton Pass and go past Dry Creek Road. Turn right onto Long Canyon Road. About 0.7 miles, the dirt parking lot for Long Canyon trailhead will be on your left.
If you hike the Mescal trail to Devil’s Bridge, Long Canyon trailhead is right up the road from it.
THE ADVENTURE:
Start of the Trail:
After spending our time at Devil’s Bridge, we decided to hike to Birthing Cave since it is just down the road from where we parked. (We did the Mescal trail to Devil’s Bridge). There is not a lot of shades on this trail so bring a lot of water, and a hat.
The trail to Birthing Cave is quite simple. After parking at the small dirt lot, you can follow the wide dirt road. There should be a sign at the trailhead point toward the Long Canyon trail. After about 0.6 miles, you’ll come up to a fork, marked by a wooden fence. You want to turn left here.


After turning left, you’ll want to go straight toward the red ridge where the Birthing Cave sits in. That path eventually curves left, with the Birthing Cave on the right-hand side. As you get closer, you’ll notice a few paths that will take you up to the cave. Choose the one that is the easiest for you. Please be careful when you climbing up or down the cave. The combination of fine sand and smooth rock can be very dangerous. Dustin slipped and almost died there (well…dying is a bit exaggerating, but you get the point).
To the Cave:
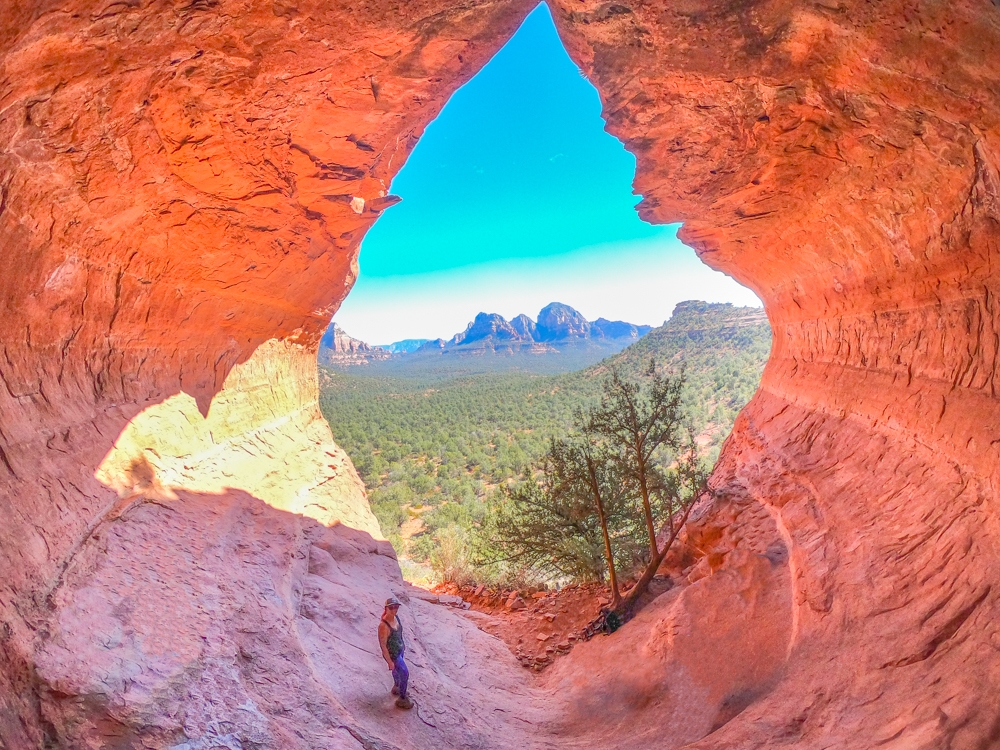
Once you get on the top, the cave opens up to this incredible view. The cave frames the stunning landscape of Sedona perfectly. There is a small “belly button” in the middle of the cave. You can climb in it but it is very slippery. If you do, again, please be very careful. As we mentioned above, this cave is a sacred place. Please, be quiet and respectful when you’re visiting.
Once you’re done enjoying the view and taking in all the healing energy, you can get back the way you can from.


Note on photography: This cave is very wide. If you want to take picture of the entire cave, you will need either a GoPro or a very wide camera lens. Pano will work too.
This hike is perfect to pair with other longer hikes in the area such as Devil’s Bridge. Or you can just spend all your time there. Another awesome hike is Cathedral Rock. This is a must-do! Don’t forget to check out our off-roading tour Broken Arrow with Pink Jeep Adventures!
Happy Adventuring. Don’t forget to follow us on Instagram, subscribe to our Youtube channel, and sign up for our newsletter!
RECOMMEND GEAR:
These are the gear that we personally use and find them helpful for this particular adventure. Don’t forget to check out our Recommended Gear section as well.
The majority of these links are through our affiliate links so if you buy something, it is at no extra cost for you but it helps us support the site. That being said, don’t buy something just to support us, buy something if you think it will enhance your travels and adventures.
• Hiking shoes
It’s an easy hike, however, climbing up to the cave can be very slippery. It’s good to wear your hiking shoes. Vy’s shoes are Merrell Women’s Moab 2 Mid Waterproof Hiking Boot. Dustin’s shoes are TARGHEE III WATERPROOF.
• Snacks
Always bring snacks!
• Sunscreen
The trail can get very warm. Bring sunscreen! We use eco-friendly, reef-safe sunscreen, All Good Organic Sunscreen Butter – Zinc Oxide – Coral Reef Safe, and All Good Sport Sunscreen Lotion – Coral Reef Safe (3 oz)(2-Pack) or Stream2Sea SPF 30 Reef Safe Sport Tinted Sunscreen.
• Water
The trail can get very warm! Bring lots of water. Especially if you go in the afternoon. Vy uses the Camelback L.U.X.E. Dustin uses the Clik Small pack (sadly Clik is no longer around). Patagonia Women’s Nine Trails Pack 18L is also a great backpack for a shorter hike like this.
• Jacket
Depends on the season, it might get a bit chilly. We love our packable Patagonia Puff Jackets! It can keep you warm, yet pack up super light. You can get Vy’s version here, and Dustin’s version here. If you want some lighter, we love the packable Patagonia Women’s Houdini® Jacket and Patagonia Men’s Houdini® Jacket
CAMERA GEAR:
• Camera:
Sony a7 III
Gopro Hero 7 Black
• Lenses:
Sony 24 -70mm f/2.8 Carl Zeiss Vario Sonnar T Zoom Lens
• Accessories:
GoPro The Handler Floating Hand Grip – Official GoPro Mount
Aluminum GoPro protection frame
SandMarc Extended GoPro Pole
Hybrid Pro Filters – DSLR / Mirrorless
Cinema CPL Filter – HERO 9


3 Comments
Namitha J
Such an informative post! Inorder to get that picture of the birthing cave, do you have to climb up the slickrock to the “belly button” or can you take it from the same level is Vy in the picture?
Vy
Thank you! The cave itself is pretty high, you either have to climb in the “belly button” or use a long selfie. Also, we recommend using a wide-angle lens for this. The GoPro actually did pretty well.
Joanne
Thankyou for the information. It took us 2 tries to get to the caves. Like you mention, no one on our first day were able to tell us where to turn to get to the cave either because they did not know or because they did not want us to know. The person that tried to veer us away into a far off incorrect place seemed angry (maybe rightly so) and mentioned that people had recently toppled some of the rocks off the ancient wall near the subway cave.
Either way, I wanted to share a tip I gave out to iphone people to take pictures of the full cave. Put your setting to panoroma (pano) and go in the direction of up and down vs side way and you will be able to get the cave pic .. 🙂
P.S. Thanks for your post.