
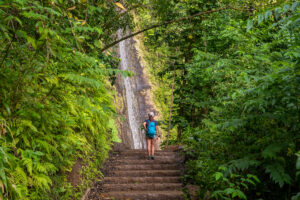
Dustin and I LOVE challenging hikes. Therefore, when we heard about the Olomana Trail aka Three Peaks in Oahu, we knew we had to make a trip there. The Olamana trail is a very difficult and dangerous hike that offers breathtaking views and exciting challenges. While getting to the 1st peak is the easiest, the trail gets significantly more challenging as you hike on. Getting to the 3rd peak is very strenuous since it requires a very steep descent down a slippery cliff and then climbing up narrow ridges with many fully exposed sections. It is a long way down if you fall. Even with ropes, technical climbing experience is highly recommended for this trail. Nevertheless, this hike is worth every moment!
WARNING:
The Olomana Trail aka Three Peaks is a very dangerous and strenuous hike. Many hikers have died on this hike. DO NOT ATTEMPT THIS HIKE IF IT’S RAINY OR HAD RAINED THE DAY BEFORE. The entire hike is dangerous, however, it becomes a lot more treacherous after the first peak. By the end of the trail, you are no longer hiking but scrambling on technical class 4 or 5 sections. You will be scaling vertically on the side of the mountain, fully exposed, holding onto ropes. If the weather turns bad, it would become a life-threatening situation even for experienced hikers. PLEASE DO NOT ATTEMPT UNLESS YOU’RE 100% SURE OF YOUR ABILITY, ALSO, DON’T DO THIS HIKE ALONE. Technical climbing experience is highly recommended.
Stats
Where
Olomana Trail ( Three Peaks) Trailhead:
21°22’06.3″N 157°45’39.5″W
Parking
The closest parking is at the corner of Auloa and Loop Road, just off the Pali Highway or along Auloa Road. You cannot park along Loop Road. It is private property.
Restroom
There is no restroom.
Fee
Free
Pet-friendly
The Olomana Trail is NOT a place to bring your dogs. Please leave them at home for their safety as well as yours.
Distance
4.4 mi R.T.
Elevation Gain
1856ft
Level
Strenuous, semi-technical trail with many exposed climbing sections.
Time:
3-5 hours
Ideal Time
Dry, calm days are the best time to do this hike. We recommend avoiding this hike after a big rain or if there is rain in the forecast. Also, go early in the day so you have enough daylight and do not have to rush.
Weather
Video
Getting to the Olomana Trail aka Three Peaks Trailhead:
The trailhead for the Olomana Trail is located on Loop Road, inside the Royal Hawaiian Golf Club. Since it is inside the golf course property, you cannot park along Loop Road. The closest parking is at the corner of Auloa and Loop Road, just off the Pali Highway or along Auloa Road. There is a nice shoulder area and a bus stop. From here, it is about 0.8 miles on a flat paved road to the trailhead. Please make sure to obey all traffic signs and be respectful. Another option is to have someone drop you off. The trailhead will be on the left side of the road. There is a small sign in front of it, marking the way.
The Adventure
Starting the Olomana Trail
Dustin and I got to the start of the Olomana Trail bright and early. We were lucky enough to have our family drop us off right in front of the trailhead so we didn’t have to walk the extra 0.8 miles. The Olomana Trail starts under the dense canopy of tall tropical trees. So, it was a stark contrast between the bright paved street and the dark muddy trail. In the beginning, the Olomana Trail was quite muddy with intertwining exposed tree roots. It was also slowly gaining elevation. These tree roots can be ankle-grabbers so make sure to be careful when hiking along.
After the Only Fork on the Trail
About 20 minutes into the hike, we came across the only fork on the Olomana Trail. At this point, it was obvious that we needed to turn right and went up the mountain. Pro-tip: Make sure to take note of this fork on the way back. It is easy to miss it on the way back down. After a short climb up a slippery red dirt hill, we came across a small pine forest. We didn’t expect to see pine trees here so it was pretty interesting. Once passing the pine forest, the trail quickly gains elevation. The difficulty was also increasing quickly with many scrambling sections. As we climbed higher, we also started to see the views peeking through the gap between the leaves.
The Rope Sections
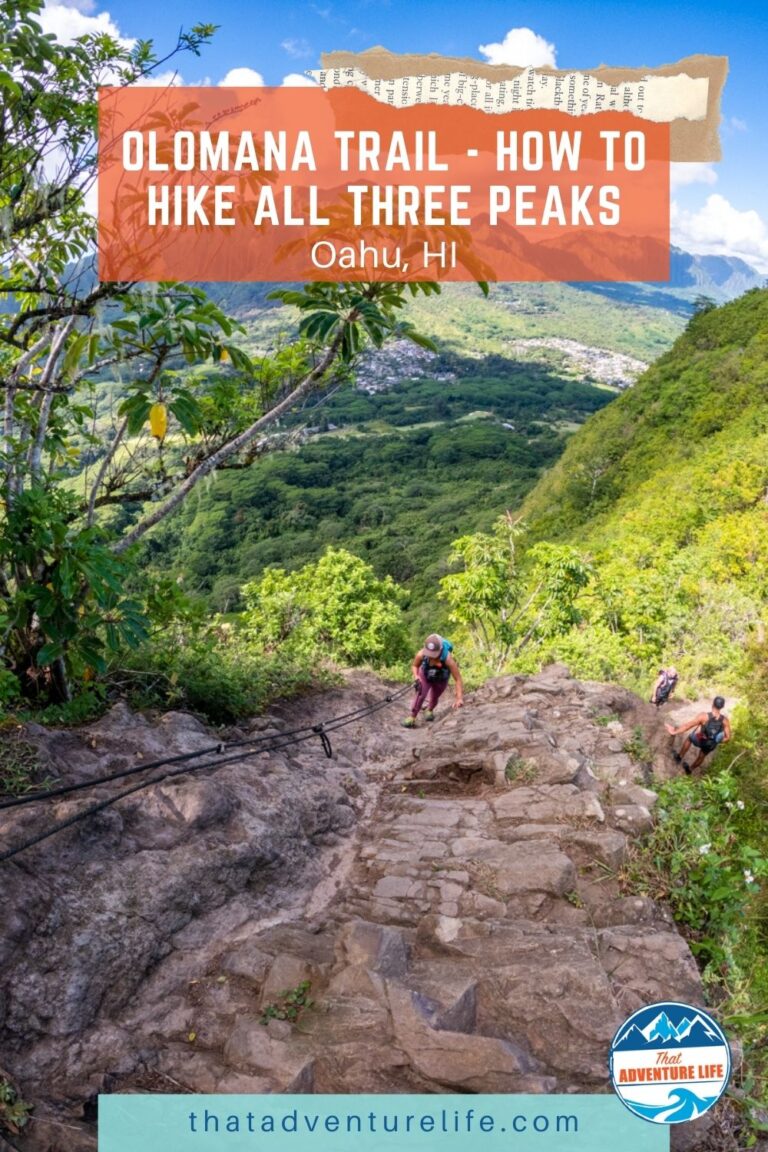
At about the 1-mile mark, we came upon the first rope on the Olomana Trail. It hangs over a steep rocky section. After this, the climb sections became steeper and steeper, also more challenging. On some of the climb sections, there are more ropes to assist. However, try not to put all of your weight onto these ropes. These ropes have been in the elements for who knows how long. So, it is a safe practice to not trust them completely.
The Biggest Challenge Before the First Peak
Finally, we reached the biggest challenge for the first peak on the Olomana Trail. It looked like we were at the end of the trail until we saw ropes hanging down from a big vertical boulder. This climb definitely looked intimidating. If this is too much for you, it is perfectly fine to turn back. It will only get harder toward the third peak. Don’t forget, if you climb up, you have to climb back down. The climb down is always harder. If you’re new to climbing or afraid of heights, this can be very nerve-racking. However, there are tons of good holds and ropes to help you with the ascend. Just make sure to take it slow and think about where to put your hands and feet.
After this monster boulder, there was a bit more climbing before we got to the first peak. It wasn’t anything as challenging as that big rock. However, you’ll still need to be able to find hand and foot holds.
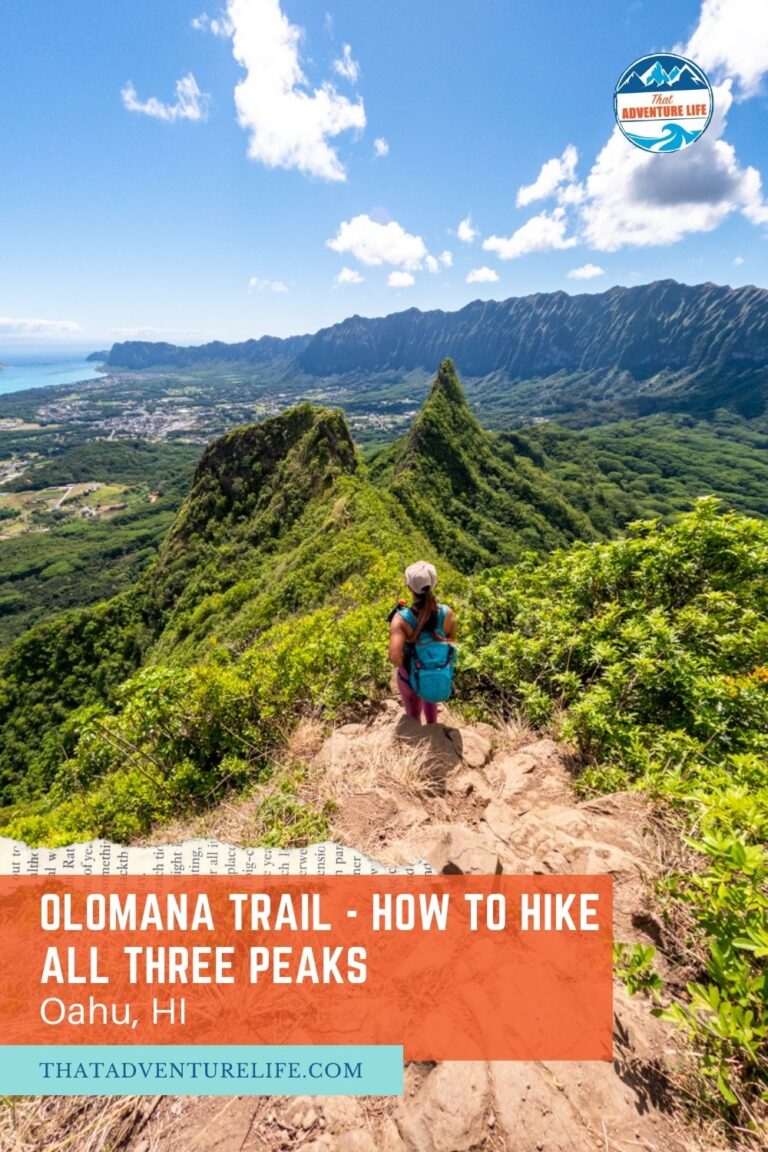
The Top of the First Peak
The views from the top of the first peak are absolutely breathtaking. This is because it is the only peak on Olomana Trail that will give you a 360° view of the whole area. On top of the first peak, you can see the views of the Windward coast and the Ko’olau Range as well as the 2nd and 3rd peaks. Most people will stop at the first peak, which is perfectly okay! Since the first peak has the best view out of all three peaks anyways.
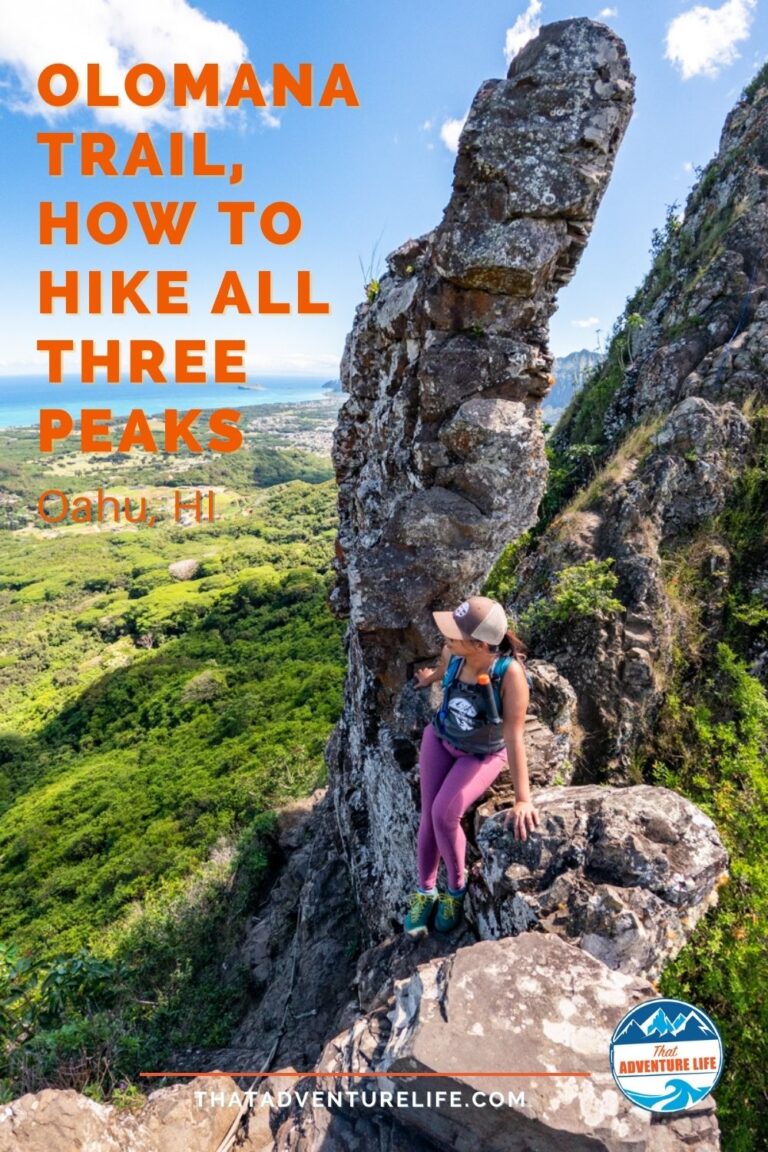
For those who are more adventurous, you can continue to on. Even though the 2nd and 3rd peaks don’t have the same good views as the first one, they are more fun to explore because of all the climbing. At least in our opinions anyways. Getting to the second peak of the Three Peaks Olomana Trail is not that bad. If you can handle the first peak, you can handle the second peak. The third peak is the most dangerous one. If you don’t have scramble/rock climbing experience, we recommend that you turn around. There are many class 5 sections that will be very difficult for inexperienced hikers. Some of the climb sections are very exposed. So if you fall, it could be fatal.
Going to the Second Peak
Once we got our fill of the first peak, Dustin and I headed toward the second peak. It immediately starts by descending down steep cliffs, some with large drop-offs. There were ropes along the way to help with the down-climb. As we said above, don’t put all of your weight onto these ropes. Some of them looked like they’d seen better days. On certain downclimb sections, it was quite slippery. We can’t imagine hiking the Olomana Trail on a rainy day. The dirt here gets extra slippery when wet.
Following a quick dip back into the trees at the valley between the first and second peaks, we started the climb up toward the second peak. The climb up was steep with narrow ridgelines and big drop-offs on both sides. Even though the climb sections aren’t as technical as the last part of the first peak, it was sketchier because of how exposed these climb sections are.
The Top of the Second Peak on Olomana Trail
Finally, we made it to the top of the second peak of the Three Peaks Olomana Trail. The top of the second peak is enclosed by a number of trees. From here, you can look back at the first peak. Or you can go past the trees for views of the ocean. There was a hammock there if you decided to take a quick break on it. Before getting to the hammock, we saw what looked like the way down to the third peak. There were ropes leading down a very steep hill.
At this point, the difficulty of the Olomana Trail increases significantly. Whatever you’ve been through up to now, it’s worse going from the second peak to the third peak. You should only attempt this final stretch if you’re experienced with rocky scrambles, are not afraid of heights, and have technical climbing skills. It’s not anything crazy rockclimbing wise, however, the climbs are fully exposed with massive drops. Having technical skills will help you stay safe.
Getting to the Third Peak
As we looked down the hill toward the third peak, it looked very steep. So steep that we couldn’t even see the end of the ropes. Nevertheless, we trusted our shoes and our abilities so Dustin headed down first. The descent is definitely very steep without many good holds. The ropes definitely help a ton, even though we were still skeptical about trusting them completely. Besides being steep, it’s also very slippery. Having good shoes with great traction is a must here. It also helps if you can look down calmly and find places to put your hands and feet.
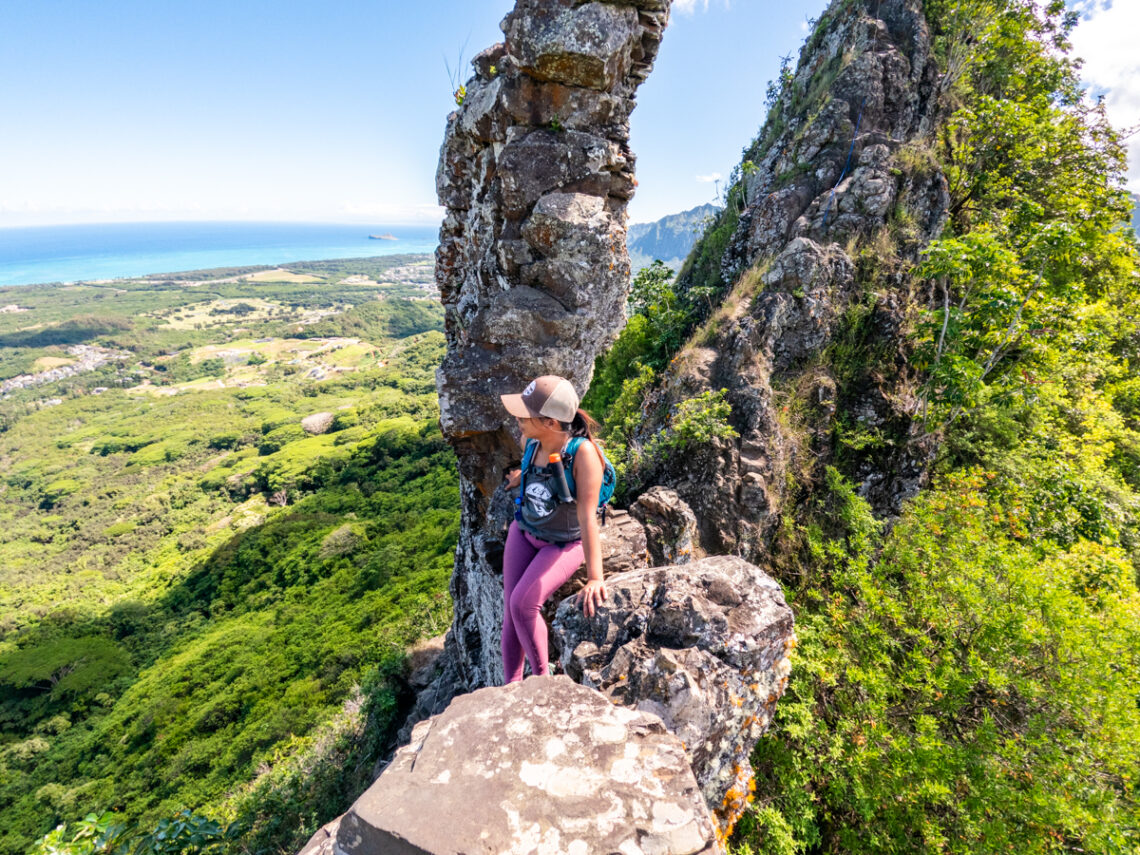
After this big drop, the hike evened out for a bit before climbing back up. You’ll also be hiking along the narrow ridgelines with big drops on both sides. It is only 0.2 miles from the second peak to the third peak but it seemed like it went on forever. The climb sections here are a lot sketchier than the last two peaks because of how exposed they are.
The Rocky Fin
Soon enough, we came upon another sketchy part of this final stretch to the third peak of Olomana Trail. It is a descent where you need to downclimb and around a rocky fin down to a narrow ridge with steep drop-offs. This section is completely exposed so it was definitely a bit nerve-racking. Once we came around this section, there is another big climb go to back up the other side of the rocky fin. This section will require some upper body strength to pull yourself up.
Once we passed the rocky fin, we encountered our next obstacle, a big sketchy exposed climb. This climb wasn’t that difficult but since it was fully exposed, it was quite risky. After we got up this sketchy climb, there was more scrambling along a very narrow ridge. There were two more treacherous climbs before we reached the top of the third peak.
The Top of the Third Peak on Olomana Trail
Even though the top of the third peak doesn’t have the best views compared to the first and second peaks, however, it was still very beautiful. In our opinion, it was in some ways more breathtaking because of all the obstacles that we had to overcome to get here. Apparently, if you want to continue on, there was a rope ladder that lead down the other side of the third peak. It was a pain in the butt to get back up that rope ladder if you decided to go down. Unless you have very good upper body strength, don’t do it! We didn’t.
The Way Back
After celebrating our victories, we came back the same way we came from. It was a lot more treacherous to climb back down than climbing up. The exposed sections looked extra steep. Some of the downclimb sections can also get slippery. Therefore, please make sure to be very careful, take it slow, and watch your footing. It is a long way down if you fall!
Olomana Trail has made its way to our top 10 all-time favorite hikes. We love hikes with fun obstacles and challenges so this one fits right in. We can’t wait to come back and do this hike again. If you haven’t done it yet, check out the Moanalua Valley Middle Ridge Trail. That is another wonderful trail that Oahu has to offer. For other things to do, check out our top 10 things to do in Oahu.
These are the gear that we personally use and find them helpful for this particular adventure. Don’t forget to check out our Recommended Gear section as well.
adventure gear
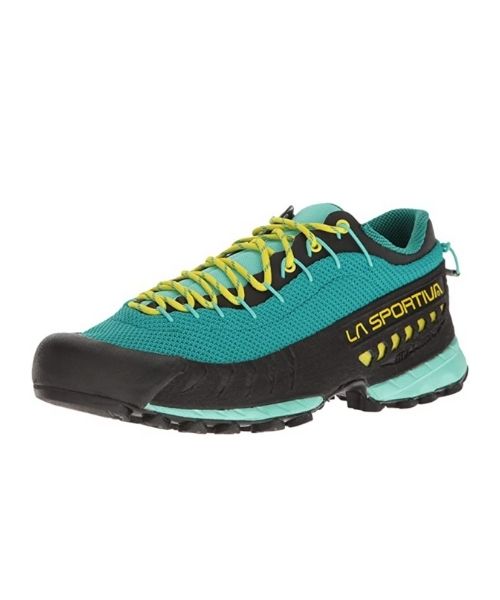
Sturdy shoes with A LOT of tractions are a MUST! It makes a big different when you do this trail with proper shoes. We love our La Sportiva. Vy’s version.

Dustin’s version for La Sportiva shoes

Make sure to use lots of sunscreens! We use eco-friendly, reef-safe sunscreen, Stream2Sea SPF 30.

Face sunscreen is also important. We love these tinted, organic All Good Organic Sunscreen Butter.

You want to bring more water that you think you need. Vy loves the Camelback L.U.X.E.
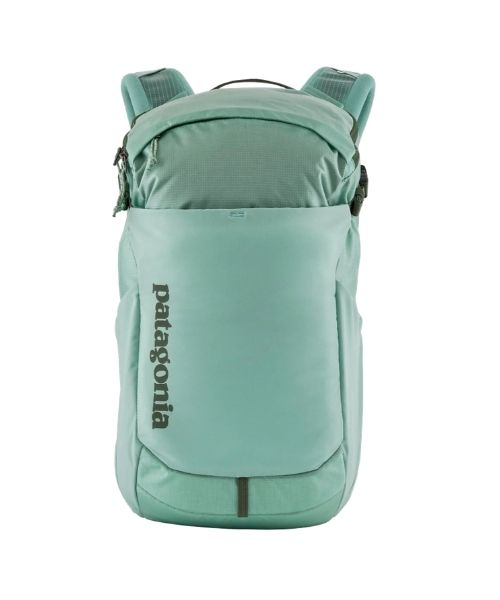
For shorter hikes, the Patagonia Women’s Nine Trails Pack 18L is perfect to hold water and your essentials.

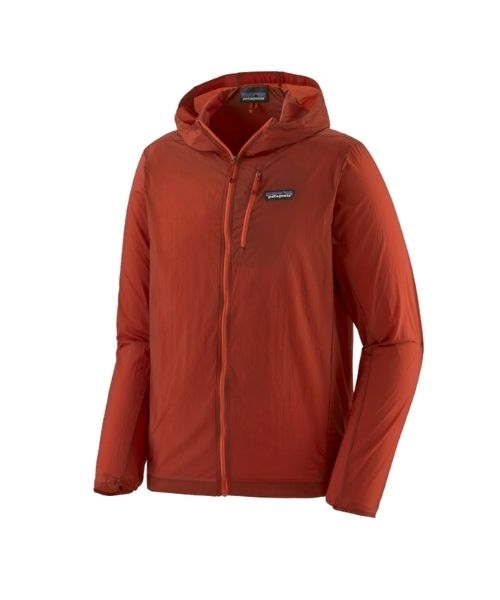
If you want something lighter, we love the packable Patagonia Women’s Houdini® Jacket and Patagonia Men’s Houdini® Jacket
other things to bring
- Gloves – we didn’t use ours, because we tried to climb instead of relying on the ropes. However, it might help you on the ropes if your hands are sensitive.
- Headlights – in case you get caught in the dark.
- Lunch and Snacks – You’ll want to have enough energy to climb those tough spots. For healthy and easy snacks, check out some of our recipes.
camera gear


Related Posts
Save your pins:

