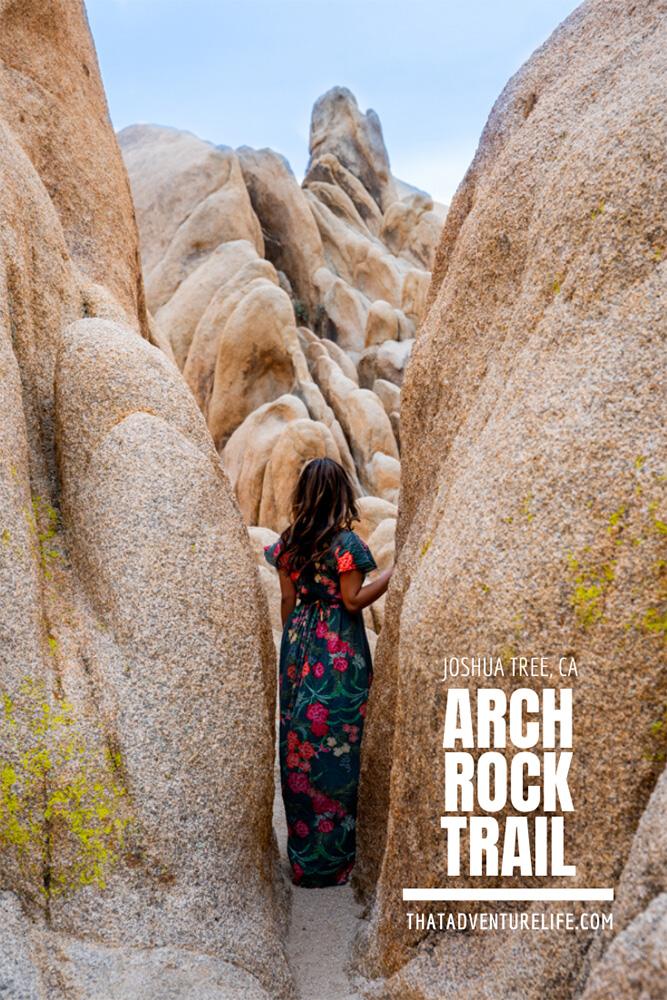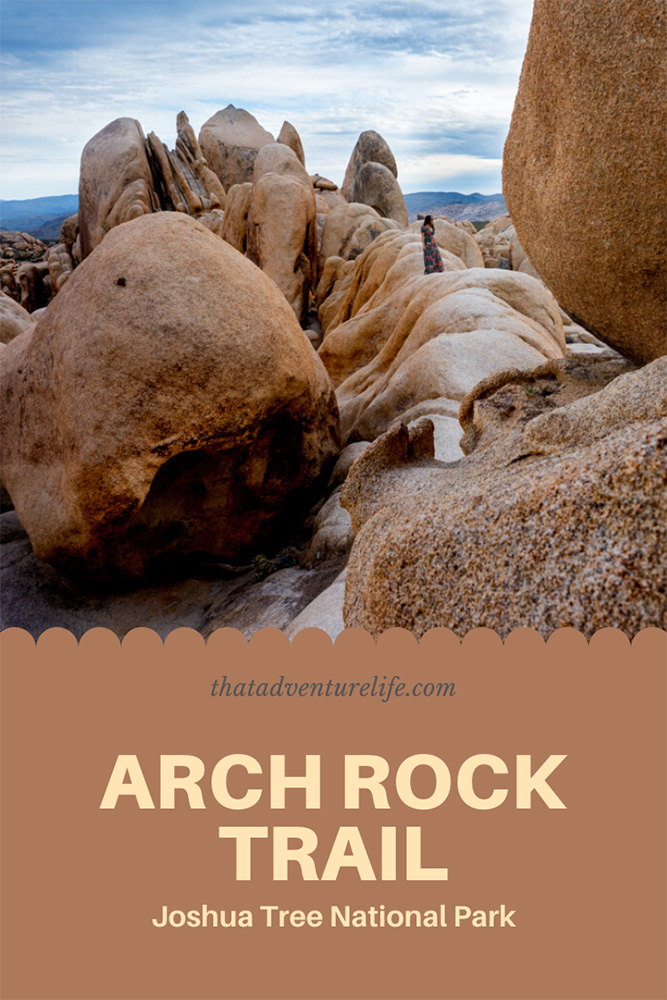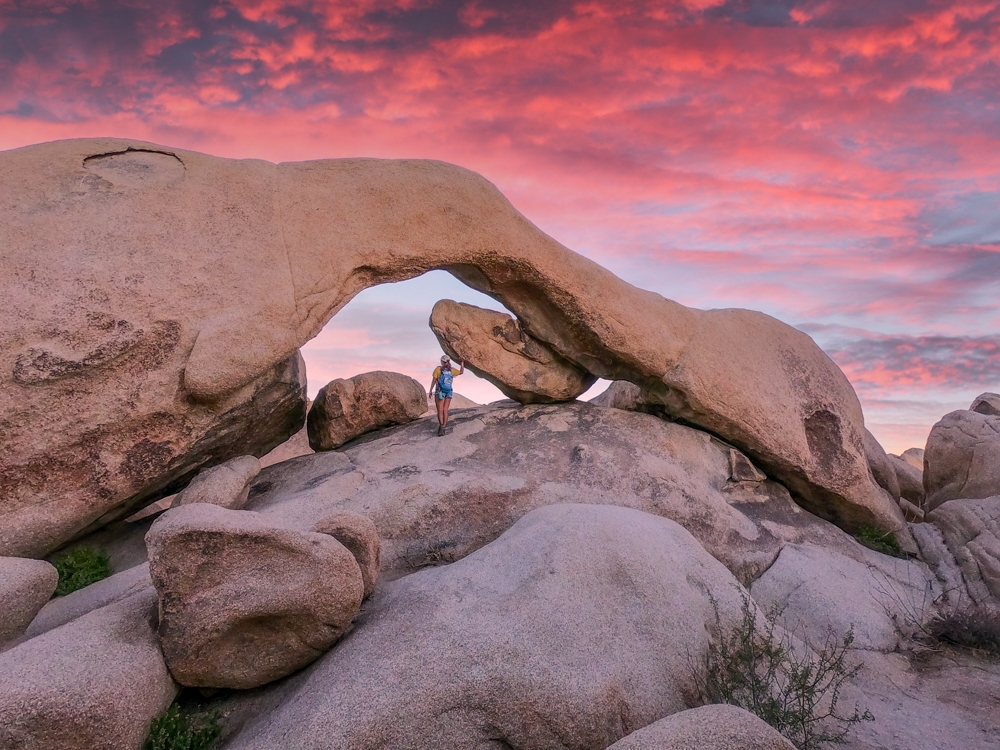
Besides the Cholla Cactus Garden, Arch Rock trail is another one of our favorite quick stops in Joshua Tree National Park. In fact, it is my favorite here. Obviously, you’re here to see the Arch Rock, hence the name of the trail. And it is quite awesome, a large natural rock formation about 30 ft across and very easily accessible. However, what makes this place so special is that it is surrounded by so many other super awesome rock formations, one of which I named “The Spine” and another famous one, Heart Rock. There are so many things to see here so you can explore as much or as little until your heart is content.
STATS:
Where:
Twin Tanks parking – Coordinates: 33°59’24.6″N 116°01’20.9″W
White Tank parking –Coordinates: 33°59’06.5″N 116°01’00.0″W
Parking:
The shortest way to Arch Rock is to park at White Tank Campground. However, the few limited spots at White Tank Campground are reserved for people with disabilities. So unless you camp here, I would start from the Twin Tanks parking lot.
Twin Tanks parking lot is a big, paved lot.
Fee:
There is a fee to enter Joshua Tree National Park. There is an entrance fee of $30 per vehicle for 7-day. You can also either purchase a park-specific annual pass for $55 or get an America the Beautiful National Parks pass for $80. For up to date fee info, click here.
Restroom:
There are vault toilets at White Tank campground.
Distance:
1.2 miles R.T
Elevation Gain:
80 ft
Level:
easy
Estimated Completion Time:
30 minutes to 2 hours depending on how much you want to enjoy the scenery.
Ideal Weather:
Spring is the best season to visit. Summer can get very hot while winter can be freezing cold.
Ideal Time:
Mornings or evenings to avoid the crowds and the heat. The sunset and night sky here is gorgeous!
Dog-friendly:
Dogs are not allow on trails at the park.
VIDEO
THE ADVENTURE:
The Arch Rock trail’s trailhead at White Tank campground has always been our go-to every time we visit the arch. However, recently, the park has redirected the hiking trail over at the Twin Tanks parking lot.
The trailhead for Arch Rock is located on the far right-hand side of the parking lot if you’re facing the main road. It is very easy to find. The trail first runs along the main road for a short distance before cutting across to the other side. Be careful when you’re crossing the road. Make sure to look both ways for cars.


Once you cross over, follow the trail. There are rock markings on the side of the trail, along with small signages so you won’t get lost. As you get closer to the White Tank campground, the trail can get a bit confusing because of smaller off trails and footprints. As long as you keep your destination ahead of you, you won’t get lost.


After you head up a small rocky hill, you’ll see “The Spine”, my favorite rock formation here. These giant boulders stack together to form what to me, resembles some sort of prehistoric animal’s spine. If you are not afraid of heights and little rock scrambling, you can climb on top of the spine by going through the boulders at the bottom. Caution: climb at your own risk. The Arch Rock is actually behind The Spine. You can see the arch if you stand on top here. You can also climb over to the arch from here, although I don’t recommend it.


The easier way to reach the arch is to keep going straight from that open dirt trail instead of going down to The Spine. You’ll see a little black sign with information about the arch on your right hand. Turn right at the small trail here and you’ll see the Arch Rock in all of its glory on your left. There is no right way to get up the arch from here. I usually stay to the left and find my way up the rocks. Now, you can take as many photos here as you want, but make sure to respect the place. Don’t jump on the arch or do anything stupid that would ruin this for everyone else. From here, you can either head back to the car and call it a day, or keep going further to explore the place.


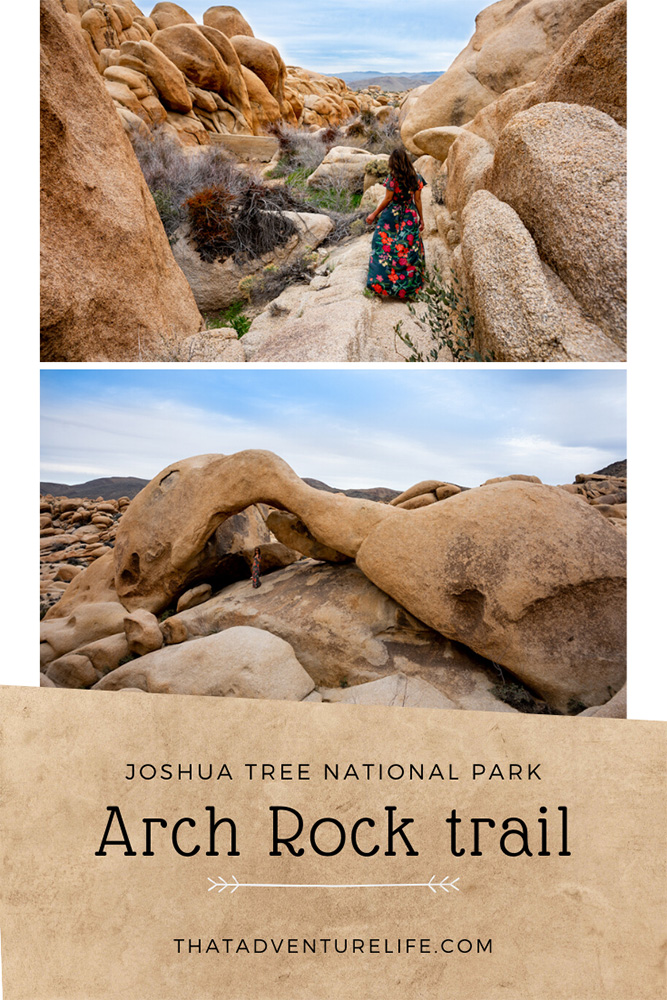
The way we like to go is to keep going straight past the arch. You’ll go through a cool little rock corridor that leads to some awesome rock walls that are actually the other side of The Spine we saw earlier. On the left-hand side, in the middle of the rock corridor, you’ll spot “The Eye”, a tall triangle rock with a hole in the middle. You can actually climb up into that hole. Again, climb at your own risk as it can be very slippery. To pass through the corridor, you have to squeeze your way through a very narrow gap between two rocks. It’s a pretty tight fit and we usually need to take our camelbacks off to make it through.


Just after the gap, you will see a small trail that curves off to your right side. It is very short and probably only goes about 100 yards. This tiny trail dead ends at a boulder that we have come to affectionally name the “Indiana Jones Boulder”. It is a massive round boulder that is pinched in between two rocks on the sides in a truly gravity-defying fashion. It is very reminiscent of the boulder scene from Raiders Of The Lost Ark. For some reason, this spot never seems to get old for us. We love making our way back there and taking pictures that look like we are running from it.


If you head back to where this trail joins back up with the narrow gap, you will see several rows of almost waist-high rocks to your left. Summon your inner ninja warrior, parkour over a couple of the rows, and make your way to the south. You will find your way up onto a small ledge that snakes around a big boulder and drops down into a soft sandy wash. Here, you will find a concrete dam. I’m not sure why, but we love to stop here for pictures too. It’s just an interesting man-made object out in the middle of nowhere. By the way, this is how you go hiking in a dress…


Head up the sandy wash. If you look off to your right, you can see some pretty unique rocks. They have veins of other rocks running through them. The next part takes a little bit of exploring. When heading up the wash, you will make your way past several desert plants. Be careful, some of them have very nasty thorns. If you pay attention, you will find a small cave off to the left. It’s more of a series of overhanging rocks. This is a very welcome sight if you are doing Arch Rock trail in the warmer months. It’s a quick break in the shade.


The cave goes in probably about 25 feet and then makes a hard right through a very small gap (it is a very tight squeeze), and opens into a bigger room. From here, you can head up the hill, where you will find yourself at the backside of the arch. It’s kind of cool to see it from all angles. After you go past the arch, you can either make the sharp left to return to the same trail you took earlier, or take the fork off to the right to stretch the hike out just a bit longer. The longer route will showcase some of the various desert plant life in the park. And if you are lucky, you might even see a Chuckwalla or two! The Arch Rock trail has become a must-see every time we find ourselves in Joshua Tree.


Happy Adventuring. Don’t forget to follow us on Instagram, subscribe to our Youtube channel, and sign up for our newsletter!
RECOMMEND GEAR:
These are the gear that we personally use and find helpful for this particular adventure. Don’t forget to check out our Recommended Gear section as well.
The majority of these links are through our affiliate links so if you buy something, it is at no extra cost for you but it helps us support the site. That being said, don’t buy something just to support us, buy something if you think it will enhance your travels and adventures.
• Hiking shoes
You’ll want to go rock scrambling here. Make sure to wear good shoes with tractions. Vy’s shoes are Merrell Women’s Moab 2 Mid Waterproof Hiking Boot. Dustin’s shoes are TARGHEE III WATERPROOF.
• Snacks/Lunch
Always bring snacks with you! This trail has some beautiful areas for a quick lunch too!
• Sunscreen
Bring sunscreen! We use eco-friendly, reef-safe sunscreen, All Good Organic Sunscreen Butter – Zinc Oxide – Coral Reef Safe, and All Good Sport Sunscreen Lotion – Coral Reef Safe (3 oz)(2-Pack) or Stream2Sea SPF 30 Reef Safe Sport Tinted Sunscreen.
• Water
Doesn’t matter when you go, always make sure to bring plenty of water. Especially if you go in the afternoon. Bring extra because you have to hike in to start this trail. Vy uses the Camelback L.U.X.E. Dustin uses the Clik Small pack (sadly Clik is no longer around). Patagonia Women’s Nine Trails Pack 18L is also a great backpack for a shorter hike like this.
CAMERA GEAR:
• Camera:
Sony a7 III
Gopro Hero 7 Black
• Lenses:
Sony 24 -70mm f/2.8 Carl Zeiss Vario Sonnar T Zoom Lens
• Accessories:
GoPro The Handler Floating Hand Grip – Official GoPro Mount
Aluminum GoPro protection frame
SandMarc Extended GoPro Pole
Hybrid Pro Filters – DSLR / Mirrorless
Cinema CPL Filter – HERO 9