Our first time visiting the Cave of Munits was about 4 years ago. At that time, we had no idea what to expect. Luckily for us, as we climbed up into the cave, we ran into a couple of guys that had hiked it before. We ended up tagging along with them as they showed us the way up the mountain to the ridgeline above. When our buddy Natasha wanted to go with us on an awesome adventure, Cave of Munits was our first choice. I mean, you can’t go wrong with a super cool chimney cave plus the action-packed climb up the ridgeline to the summit of Castle Peak where you’ll have a panoramic view over the west end of the San Fernando Valley.
STATS:
Where:
El Escorpion Park (Trailhead) – Vanowen St, West Hills, CA 91307
Coordinates: 34°11’43.2″N 118°39’31.0″W
Actual Cave: 34°11’49.8″N 118°40’11.8″W
Parking:
There is street parking.
Fees:
Free
Restrooms:
There are no restrooms.
Hours:
6 am – 7 pm
Distance:
0.8 miles to the cave
2.1 – 2.5 miles if you want to complete the loop to Castle Peak and back to the trailhead.
Elevation:
250 ft to the cave
750 ft if you complete the loop.
Level:
Easy if you just want to go to the cave and back out. Moderate to difficult if you decide to complete the loop (It requires a lot of scrambling and climbing steep vertical inclines up the mountain behind the cave.)
Estimated Completion Time:
1.5 hours – 2 hours
Ideal Weather:
Winter and Spring are the best seasons to go. It gets very hot in the summer. You have a good chance of seeing rattlesnakes in the summer as well.
Ideal Time:
Go there early morning or late afternoon, when the temperature is cooler. The lighting is better for pictures too.
Dog-friendly:
You can bring dogs on the flat trails. However, we wouldn’t recommend bringing your pups up this route.
THE HISTORY:
Cave of Munits is an important part of the history of the Chumash Native American tribe. According to oral history, this cave was the home of a mythical Chumash shaman. He ultimately met his end by execution after murdering the son of the Chumash chief.
THE ADVENTURE:
We left our house bright and early in the participation of an awesome adventure. After picking up Natasha, we headed straight to L.A. If you want to do this trail, make sure to park near El Escorpion Park at the end of Vanowen Street in West Hills. The park doesn’t have official parking. However, there is plenty of street parking. There is a sign for the park right at the trailhead.
The trail started hiking up El Escorpion Trail. This is a wide dirt road curving through tall grass and a few oak trees sprinkled along the way. The tall peak in front of you when you first started is Castle Peak. Kind of a funny story, we didn’t tell Natasha at first about Castle Peak being her destination. She told us she wouldn’t have done it if she knew. However, she was very happy that she finished the trail with us in the end. Anyways, you can follow this dirt road and stay left at the first junction. Castle Peak will be on your right-hand side.
After about half a mile gradual uphill, you’ll come up to a roundabout with grass in the middle of the circle. There are a few metal posts along the circle. From here, we turned right toward the mountain to climb up a steeper, rutted, small dirt trail to the Cave of Munits. It is about 0.3 miles from the roundabout to the cave. You’ll know when you get there because Cave of Munits is at the dead end.
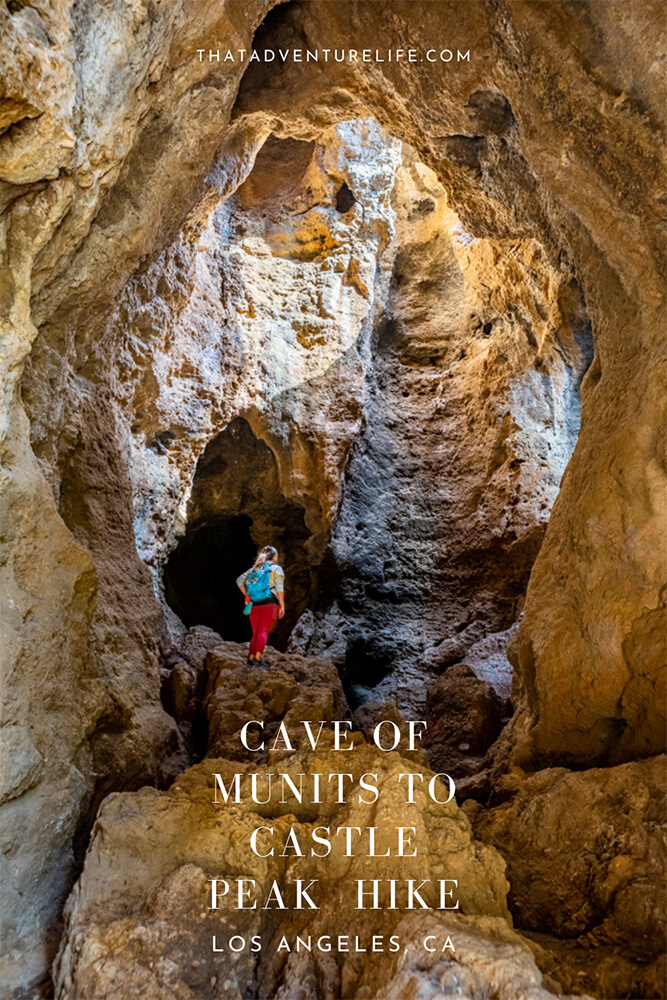
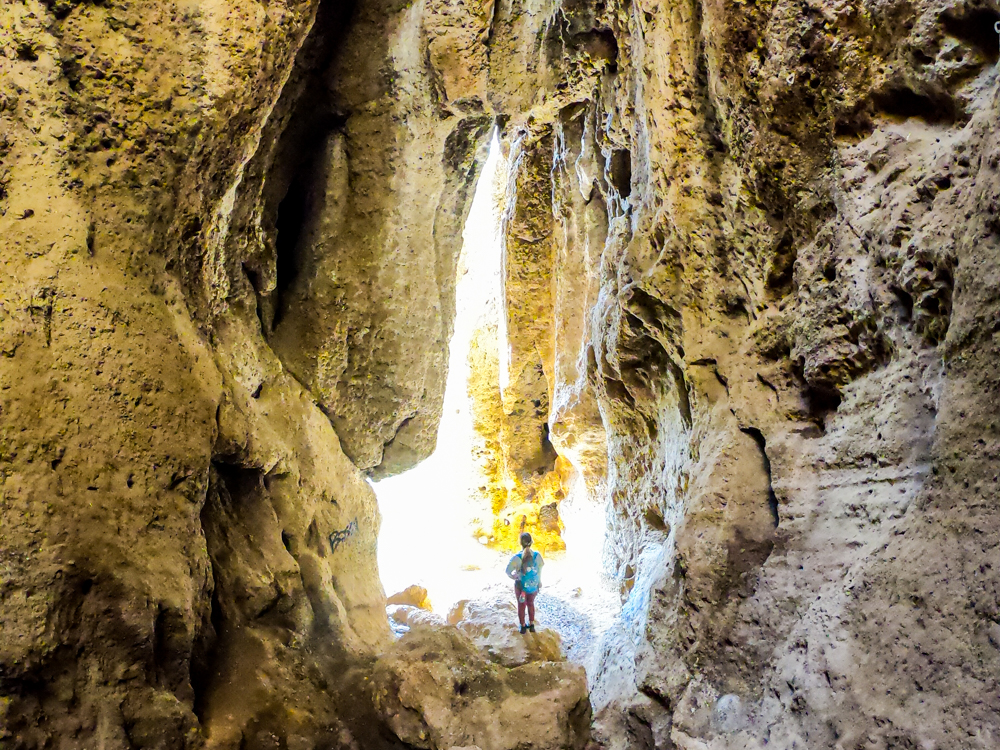
On the approach, you can’t really see the entrance to the cave. Cave of Munits just looks like a tall, looming cliffside. As you get closer, you can see the tall, narrow slit in the rocks. Even though it looked quite impossible to get in, you can actually scramble your way up using the rocky ramp below the left side of the cave. Be warned, it is not easy to climb up to the cave. It is very slippery and steep. We definitely recommend wearing good hiking shoes with great traction. You will need them for scrambling up to the ridgeline from the top of the cave as well. Natasha made it with her gym shoes, however, she is a badass and she still had regretted her shoe choice ever since.
Once you get inside the cave, the view is magnificent. From the entrance of the cave, you can see the view of the valley. Depending on the season, you can see green peaks that go on for miles. The Cave of Munits is only 15 ft wide but it has an impressively tall cathedral ceiling. The tall entrance along with the skylights in the ceiling give this cave plenty of natural light. Unless you want to explore the dark chamber in the back of the cave, you won’t need any flashlights. Once you’re done exploring the cave, you can either climb back down and return the way you come from. If you are still hungry for more adventure, you can continue up a steep ascent to Castle Peak where you’ll have expansive views of the surrounding areas and get a great story to tell.
To continue to Castle Peak, you will have to climb through the opening on the left-hand side if you’re facing the cave’s entrance from the back of the cave. The opening is about 20 ft off the floor. If you decided to climb up into the cave, it is a lot easier to climb through this opening. Once you get out of the cave, you’ll go straight to a viewpoint that looks over the canyon. It is beautiful but also very high so please be careful if you try to look over from the top.
After you’re done admiring the view, you can turn around and head up a small route across the roof of the cave. This route runs alongside the skylights of Cave of Munits from below. From here, the hike will get quite exciting. We scrambled our way along the boulders above the cave to a dirt path that went straight up the steep mountainside. It is about a 0.2 miles climb up to the ridgeline with about 450ft gain. There are no official trails on this part on the hike. Your objective is to climb up to the ridgeline as safely as possible. Please be extremely careful here since there are tons of loose dirt and steep boulders. Feel free to take a break any time and take in the gorgeous view of the Preserve behind you.
Once you get to the top of the ridge, there is a worn trail following along the ridgeline, winding through big boulders and gnarly rocks that resemblance the back of a stegosaurus. This part of the trail is beautiful as you can see the panoramic view of the whole area. You will want to go right from here, heading back to the direction of El Scorpion Park. Again, please be careful as you hike along this ridgeline. It is rocky and can be slippery. Be sure to take in the panoramic 360-degree views of where peaceful nature meets the busy city.
Once you get closer to the fence line of the park, you can see Castle Peak. This peak is not much more than a collection of rocks sticking out of the ground below. You mostly climb the rocks until you reach the top. From the top of Castle Peak, you can almost see the L.A. skyline on a clear day. Once you ready to go down, you can see a few trails leading down to join up with El Scorpion Trail at the bottom of the mountains. You can take any of them, as long as you ended back up at the bottom.
The hike down the mountain is actually the worse part of this hike, for me at least. It is very steep and slippery. The trail seems to go on forever since you are descending about 450 ft. You’ll have scramble down most of the way. We took our time going down and you should too. Once you get to the bottom, make a left and head back to the beginning of the trail. You’ll be back at your car in no time.
The Cave of Munits to Castle Peak is one of our favorite trails in the area. Again, it is not for the faint of heart if you want to do the whole loop. However, it is definitely very rewarding. If you love caves, Vanalden Cave is only 11 miles away. If you don’t mind driving, the Wind Caves in Anza Borrego are super fun to explore.
Happy Adventuring. Don’t forget to follow us on Instagram, subscribe to our Youtube channel, and sign up for our newsletter!
RECOMMEND GEAR:
Don’t forget to check out our Recommended Gear section as well.
• Hiking shoes
You definitely need hiking shoes for this, especially ones with good tractions. Vy’s shoes are North Face HedgeHog GTX. Dustin’s shoes are Coleman Tasman Hiking Shoe.
• Snacks
It is a short hike but I recommend bringing some snacks just in case.
• Jacket
Depends on the season, it might get cold up there. We love our packable Patagonia Puff Jackets! You can get Vy’s version here, and Dustin’s version here.
• Sunscreen:
The whole trail is exposed. The sun can get very intense. PLEASE bring sunscreen. We use eco-friendly, reef-safe sunscreen, All Good Organic Sunscreen Butter – Zinc Oxide – Coral Reef Safe and All Good Sport Sunscreen Lotion – Coral Reef Safe (3 oz)(2-Pack) or Stream2Sea SPF 30 Reef Safe Sport Tinted Sunscreen.
• Water
Bring more than you think you need. It gets very toasty on this trail. Vy uses the Camelback L.U.X.E. Dustin uses the Clik Small pack (sadly Clik is no longer around)
CAMERA GEAR:
• Camera:
Sony a7 III
Gopro Hero 7 Black
• Lenses:
Sony 24 -70mm f/2.8 Carl Zeiss Vario Sonnar T Zoom Lens
• Accessories:
GoPro The Handler Floating Hand Grip – Official GoPro Mount
Aluminum GoPro protection frame
Save your pins: