The Big Island of Hawaii is a unique island. One second you are on pristine white sand beaches, the next, you can be standing on a lava field that reaches as far as the eye can see. With lava fields come lava tubes, a paradise for cave explorers. Kaumana Caves is a hidden gem when it comes to cave exploring. It is a remarkable network of underground tunnels that stretches for miles under Hilo. Kaumana is not really a cave but a long lava tube.
STATS:
Where:
Kaumana Caves – 1568-1644 Kaumana Dr, Hilo, HI 96720
Coordinates: 19°41’11.8″N 155°07’51.5″W
Parking: There is a decent sized parking lot on the side of the road, across from the caves’ entrance.
Hours: There aren’t any official hours, however, we recommend going during daylight hours.
Restrooms: There are restrooms just to the right of the stairs that go down to the tubes.
Distance: depends on which caves you want to explore. The one to the right when you facing down the stairs doesn’t seem to have an end. The one to the left goes on about 0.2 miles.
Elevation: about 35 feet
Level: intermediate because of the rock scrambling in the dark
Estimated Completion Time: 1 hour or more depends on how far you want to explore the caves.
Ideal Weather: Anytime, but dry days might be best. The lava tubes have their own climate. They are however not completely rainproof. There are tiny cracks in the ceiling that will drip water into the lava tubes.
Ideal Time: Going earlier might let you get the caves to yourself.
Dog-friendly: Definitely not!
THE ADVENTURE:
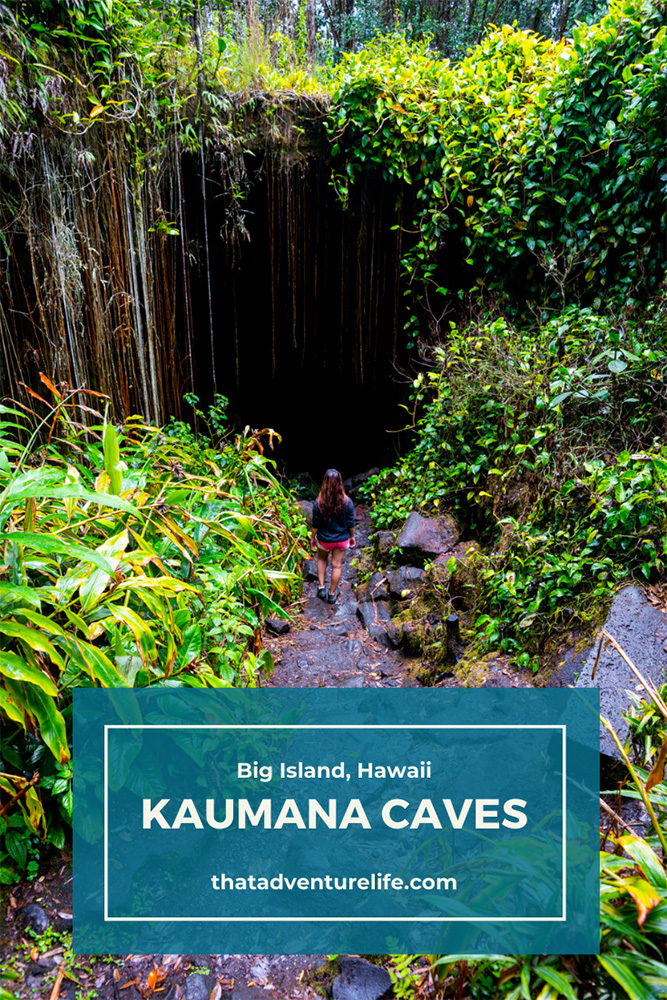
Kaumana Caves is located at Kaumana Caves State Park between the 4 and 5-mile markers. The parking lot is on the side of the road, across from the entrance. Be careful when you cross the street. The caves are located in the middle of a curve and it is hard to see oncoming traffic.
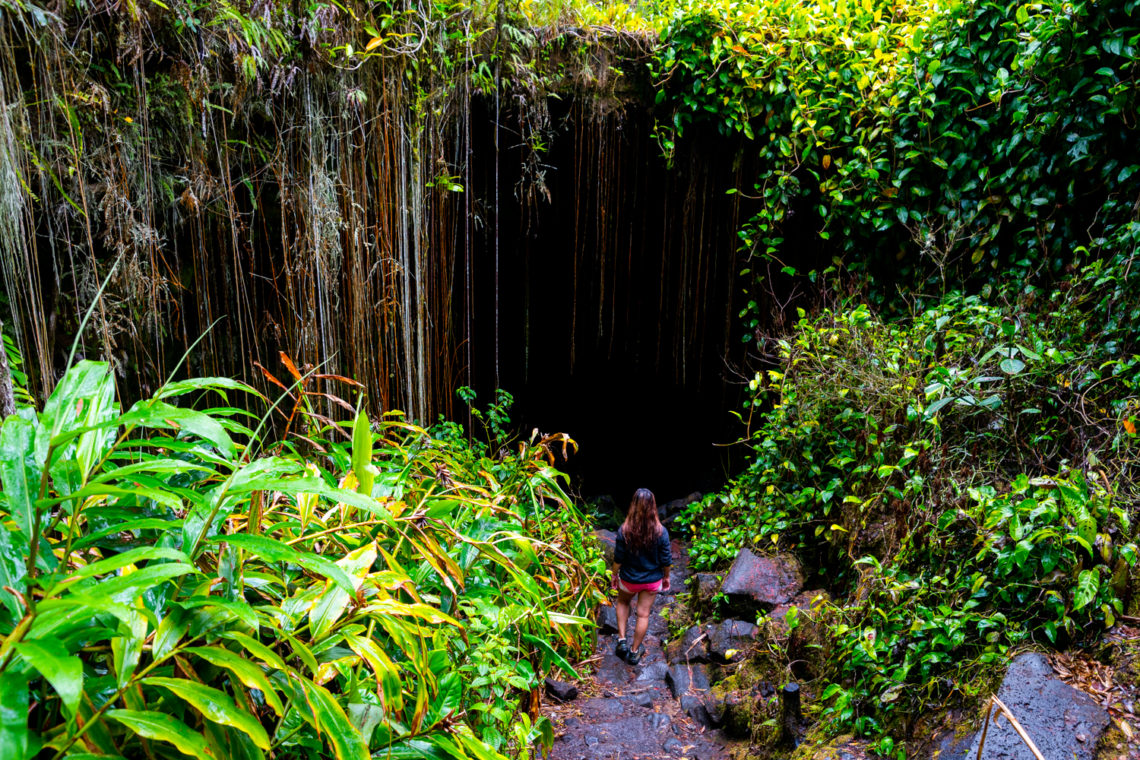
As we sprinted across the 2 lanes street, we felt something that had been all too familiar on our trip, raindrops. Even though it was a hindrance, Hawaiian rains usually pour down strong but also disappears just as fast. Just after we reached the other side of the road, we found ourselves at the top of a steep bright yellow staircase. It was almost like a yellow brick road that was leading us towards our next adventure. I couldn’t help but think “is this the right way to go?” However, with one glance over the railing, all of my questions were answered.
The yellow staircase is quite steep. It is in the middle of two caves’ entrances. Technically, Kaumana Caves used to be one big lava tube that collapsed some time ago. It must have been quite a while back because a miniature rainforest had sprouted out of the one-time molten rocks.
As the rain intensified, we made our way down the stairs as quickly as we could. We decided to take the tunnel on the right after going down the stairs. It had a much bigger and more impressive opening. Upon reaching the large opening, we saw that there was a series of boulders that we would need to scramble down to gain access to this mysterious new world. The cave’s opening is quite beautiful as it is covered with green moss, palm leaves, hanging roots, and other tropical plants.
As we have said in other articles, as tempting as it is to wear sandals for your entire vacation, you need to bring hiking shoes for this one. Lava rocks are very sharp. Also, the floors of the tubes are very uneven. You will cut your feet up for sure. As we understand, cuts from lava rocks are very prone to infection so make sure to clean your wounds as soon as possible.
Once we made our way inside the lava tube, we were treated with uneven floors and high ceilings. The interesting thing about lava rocks such as the ones you’ll find in the tubes is the wide variety of textures. It all depends on how the lava cooled, its speed when it solidified and where it was in the flow. Some areas of the floor are almost polished smooth and slippery while others are jagged and razor-sharp. Luckily, we came prepared with our headlamps because it was pitch black inside. Unfortunately, the shelter that we had run for wasn’t completely watertight. Because of multiple cracks on the ceiling of the tubes, water was dripping through the caves.
The right tunnel of Kaumana Caves is said to run for an insane 25 miles. Only 2 miles of it are open to the public, the rest of them run under private lands. We went what felt like quite a long way in. However, it was kinda hard to gauge the distance as you scrambled over rocks in pitch black through the tunnel’s many twisted passageways. It was pretty interesting seeing how the plant life had fought back against the lava rock. As we pointed our headlamps up towards the ceiling, we could see that tree roots had pierced their way into the tunnels.
We wound our way deep into the cave and up onto a ledge when we saw a distant light. We weren’t sure if it was a skylight or some creepy cave-dwelling creatures. Lucky for us, it was just a couple of fellow adventurers. They let us know that they had gone further in and the ceiling got so low that it almost required crawling. That didn’t sound super fun considering that it was on sharp lava rock so we turned back.
After getting back to the cave’s entrance, we headed over to the second lava tube. This one looks much smaller and less impressive. However, don’t let first impressions fool you. This one was our favorite. Few feet after the opening, you’ll come to a wall that looks like the end of the tunnel. There is a roughly chest-high shelf. Once I crawled under the shelf, we found the small shaft that unlocked the rest of the tunnel to us. It was a little more challenging for Dustin to make his way through this section because he’s bigger, but it wasn’t too tricky.
Right after this section, we found ourselves at the bottom of a ramp that headed up a hill. This led us to a series of large rooms that looked as high as a 2 story building. The dripping water had left calcium deposits on the wall that looked like a rib cage. We were truly in the belly of the beast.
Luckily, Kaumana Caves are quite straight forward. Therefore, you don’t really have to worry about getting lost. There was only one fork that we found and it was about halfway through the smaller cave. It’s easy to see the fork on the way in but harder on the way out. Just remember to stay left on the way back and you’ll be fine. There are also some arrows on the way that will help you find your way out.
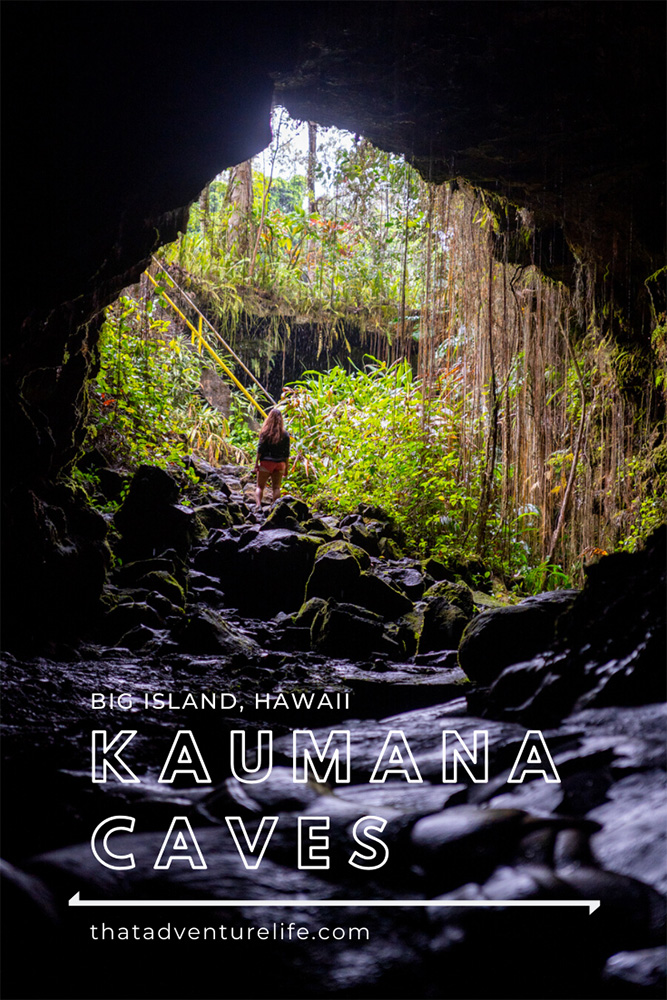
After you pass the fork, you will find yourself amongst some larger rocks and boulders. If you are capable, we definitely recommend scrambling through these. However, be very careful since these rocks are very sharp and uneven and some spots. As a result, you will be rewarded with a beautiful skylight. The light coming in was softened by the overcast sky. It beamed into the darkness like a UFO’s tractor beam. We couldn’t help but spend a little bit here taking pictures.
About 60 yards past the skylight, there is another small hole in the ceiling. However, this one is the end of the lava tube. It has little rock steps if you want to climb out of the cave. We thought that this might be the way to get back to the car. But as we took the overgrown trail that ran along the topside of the lava tube, we saw that it ended up going around the beautiful skylight. The only problem was that it was a very narrow ledge that sloped down into the lava tube. We didn’t feel like falling 20 ft so we decided that it would be safer to just take the lava tube back.
This adventure is super fun and quite easy as long as you: Bring plenty of light, wear appropriate footwear and take your time navigating through, around and over the rocks.
Since you’re in the area, don’t forget to check out the gorgeous Akaka Falls. and Rainbow Falls. Depending on how long you’re staying on the Big Island, check out our Top 10 things to do on the Big Island.
You can also hear Dustin talk about some of our favorite things to do on the Big Island on the Between The Mountains Podcast
Happy Adventuring. Don’t forget to follow us on Instagram, subscribe to our Youtube channel, and sign up for our newsletter!
RECOMMEND GEAR:
Don’t forget to check out our Recommended Gear section as well.
• Good hiking shoes with some traction, better with ankle support for the rocks.
Vy’s shoes are North Face HedgeHog GTX. Dustin’s shoes are Coleman Tasman Hiking Shoe.
• A jacket
Bring a jacket if you get cold easy. We didn’t use our jackets when we went.
• Headlight or flashlight. This is mandatory!!
Your cellphone’s light won’t work. You need real flashlight or headlight. We both used the Black Diamond Cosmo.
• Snacks.
You won’t technically need it, however, depends on how far you want to explore the cave, you might need some fuel. Or in case you got lost somehow.
• Lots of water!
It never hurt to bring extra water in case you got stuck inside the caves. Vy uses the Camelback L.U.X.E. Dustin uses the Clik Small pack (sadly Clik is no longer around).
• Gloves (We used $2 work gloves from Harbor Freight)
It’s not required but can be helpful in exploring the caves
• First aid kit
In case of scraping or cuts
CAMERA GEAR:
• Camera:
Sony a7 III
• Lenses:
Sony 24 -70mm f/2.8 Carl Zeiss Vario Sonnar T Zoom Lens
Sigma 10-20mm f/3.5 EX
Save your pins: