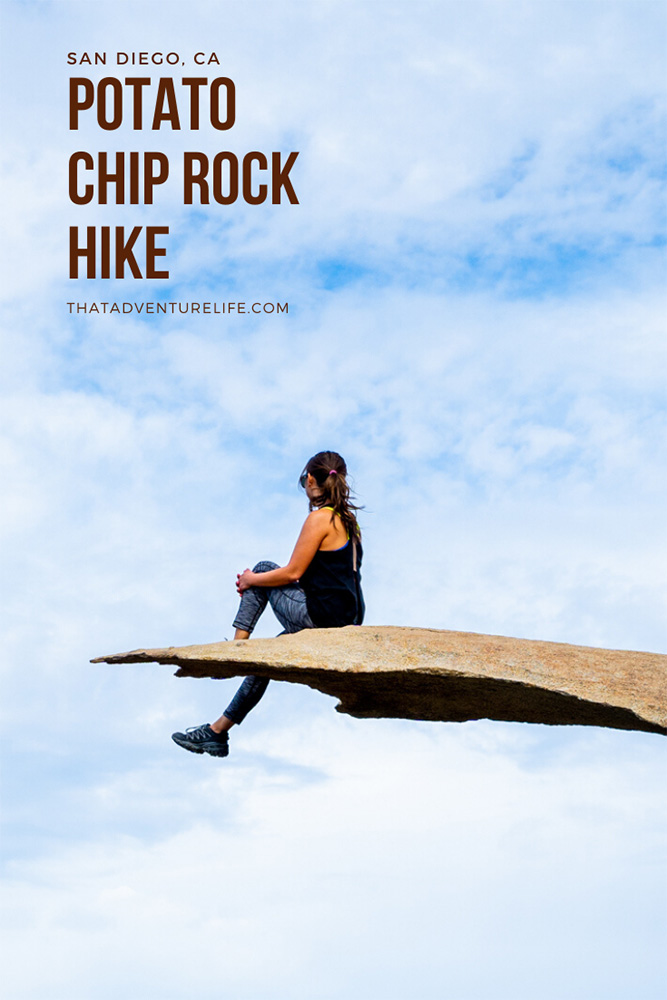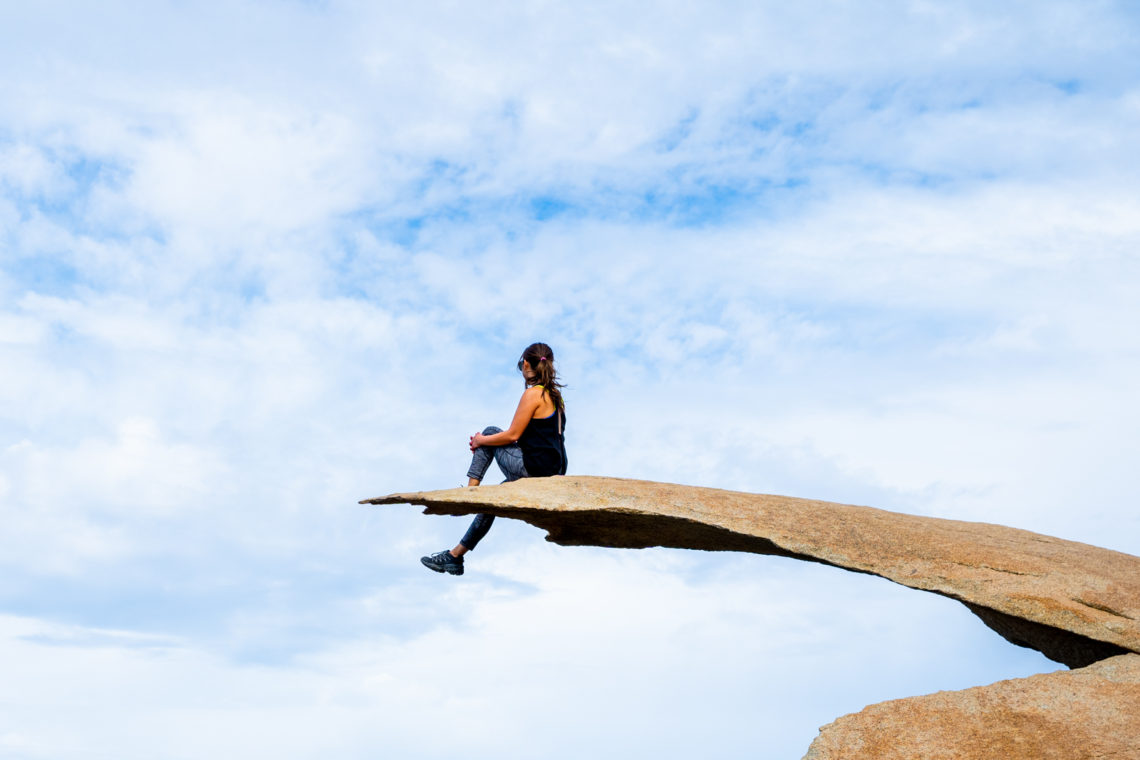
Arguably the most photographed hike in the San Diego area, Potato Chip Rock gives hikers amazing panoramic views and the chance to stand on a rock that seems to defy gravity. Every year, tens of thousands of people visit this oddly shaped rock that resembles a potato chip from the side, hence the name. Whether it is to face your fear or just to update your profile pic on Facebook or Instagram, one thing is for sure, this hike is definitely worth getting up early for.
STATS:
Where:
Potatoe Chip Rock Trailhead (Lake Poway Park) – 14644 Lake Poway Rd Poway, CA 92064
Coordinates: 33°00’20.5″N 117°00’45.1″W (This is where we park in the massive parking lot.)
Parking:
There is a big parking lot since you will be inside Lake Poway Park. Gates open at 6 A.M. and close at sunset. There is a $10 parking fee for non-Poway residents on weekends. We didn’t have to pay for parking when we went on a weekday.
Restrooms:
There are plenty of restrooms at the parking lot and a few Porta-Potties on the trail.
Distance:
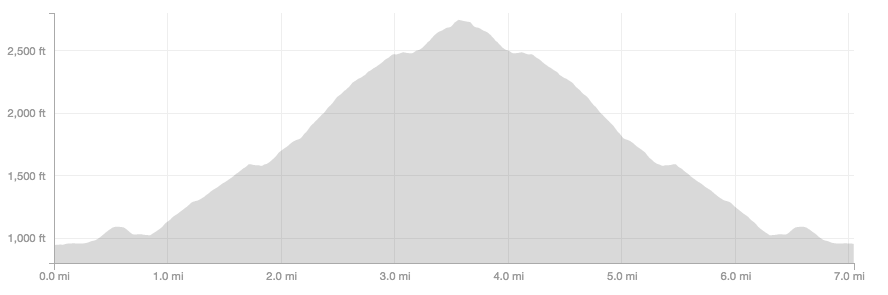
7.04 miles R.T.
Elevation Gain:
1,955ft
Level:
moderate to hard
Estimated Completion Time:
around 3-4 hours
Ideal Weather:
Cooler months in spring or winter. There is no shade on the trail. It can get extremely hot in the summer months.
Ideal Time:
The morning time will be less crowded and cooler. This is a very popular trail so the earlier you go, the more time you have to yourself.
Dog-friendly:
Yes. Please be respectful to others by picking up after your pups and bring plenty of water for them.
THE ADVENTURE:
The trailhead located inside Lake Poway Park. Once you pull into the park, there is plenty of parking inside. We usually park along the lake. We included the coordinates of where we usually park up on the “STATS” section.
To start the hike, you head down the grassy hill to the trail located right at the water’s edge. At 0.2 miles, you will come to a fork on the trail. You will want to make a left and follow the marker that says “Lake Poway Trail”. This is where you will get your first change in elevation, but luckily, it won’t be anything too major just yet. Keep an eye out to your left, there are several spots with really pretty views of the lake. Don’t let it distract you completely though. There are lots of little and medium-sized rocks on this trail that stick up out of the dirt. If you aren’t paying attention, you can definitely get tripped up on one.
Around the 0.6 miles, the trail will make a left and head down a short but fairly steep hill. While it’s a welcomed sight after the short climb, just remember that it will be uphill on the way back. We always curse it on the way to the car. About 0.2 miles later, the real climb begins. Make a right when you get to the information sign (you can’t miss it). You will be climbing pretty much the rest of the way from this point all the way to Potato Chip Rock. Get ready to get some cardio in.
The first part of this hill is a beast with 530 ft. of elevation gain in the first mile alone. It is sure to get you breathing heavy. On the bright side, the views are really pretty. On the day we went, we were treated to these adorable little white flowers. If you are allergic to bees, you may want to stay clear because they were all over these bushes. The other thing that we noticed was that someone had hidden tiny birdhouses along the trail. We ended up seeing about 4 of them. They are easy to miss if you aren’t paying attention. When you get to the top of the first big hill, you will come to a fork in the road. We always go left. I think the right trail joins up eventually but we have never tried that route.
If you are in desperate need of a break after that first massive hill, you are in luck. At the 1.7 mile mark, there is a clearing with some picnic tables set up. This is a nice spot to catch your breath, maybe grab a snack and take in the view. I must say though the view gets way better a little further into the hike. I like this portion of the hike because of the tall weeds on both sides of the trail.
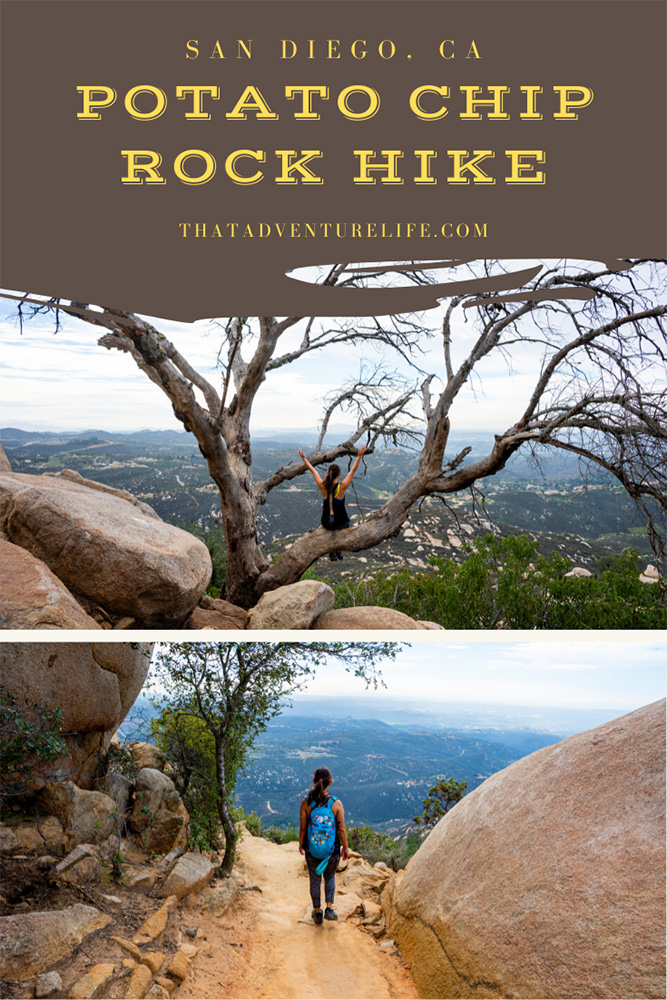
As you make your way down the short downhill area of the trail, you will come to another fork. You want to take the trail to the left towards the Mt. Woodson Trail. You will be climbing up 820 ft over the course of your 2nd mile. Luckily, unlike the first hill that is just long and steep, this hill consists of switchbacks and man-made stairs. It’s still tiring, but for some reason, it seems a bit more manageable.
Be sure to watch your step as you make your way up the stairs. Some of the steps have edges that can catch your foot if you aren’t careful. Depending on how hazy it is the day you go, you should have a nice view of Twin Peaks Mountain, Poway, and possibly even Black Mountain.
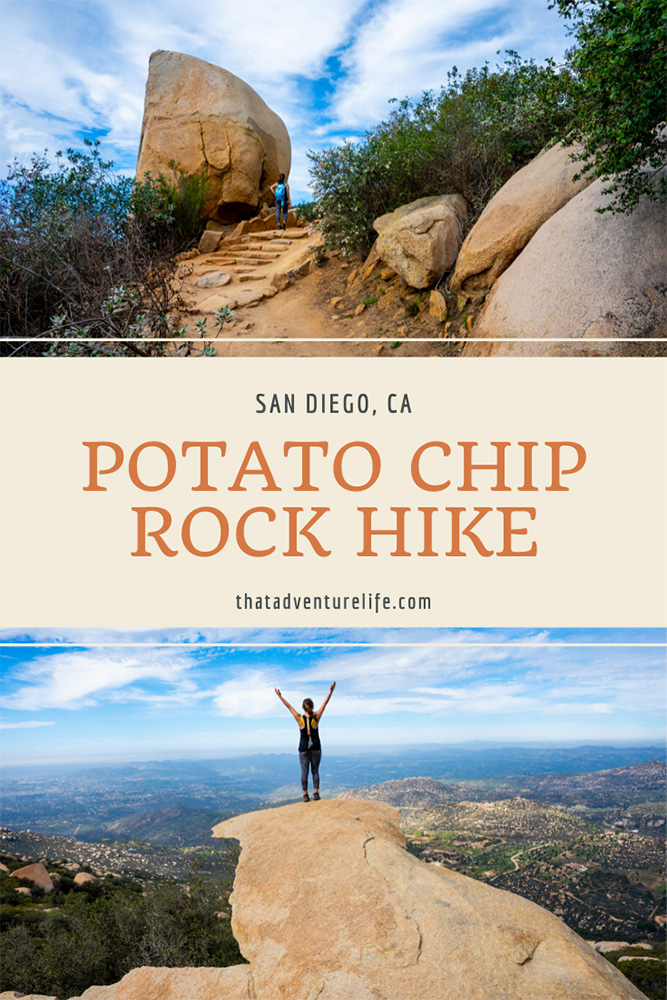
We really lucked out with the weather on the day that we went. There was solid cloud cover almost the entire time. This kept the temperature mild and gave the already photogenic landscape beautiful soft lighting. Needless to say, we were very happy about that. There are a couple of cool spots to stop at as you make your way up the mountain. The first comes around 2.2 miles into the hike. It is a huge boulder with a good-sized chunk that broke off of the side. It’s created a unique little gap that you can squeeze into for some cool photos.
The next spot comes around the 2.4 miles mark. This is probably going to be your last stop before you get up to the ridge. Here, you will find a single tree growing at the edge with some rock steps for sitting. It is another cool place to catch your breath and take in the awesome view. It is a popular rest spot for hikers to grab a snack and stretch their legs.
After you pass the tree, you are just 0.1 of a mile from reaching the ridgeline. After that, the trail gets a lot easier. Upon reaching the ridgeline, you will come to one of the last forks in the trail. You want to make a right here and stay on the Mt. Woodson Trail once again. Keep up the good work, you are only 1 mile from Potato Chip Rock!
As we made our way along the winding ridge, at about 2.6 miles, we saw a couple of hikers stopped and looking out into the hills. As we approached, I heard the man say “Look at the Hippopotamus!” We were obviously thinking that he was dehydrated or delirious from the climb. But when we looked where he pointed, it made a lot more sense. There was a giant boulder that was shaped like a hippo. Someone with a great imagination had climbed up with some rocks that looked like eyes and ears to complete the effect. It’s another thing that would be easy to miss if you aren’t looking for it.
Right around 3.2 miles, you should round a corner and get your first glimpse of Potato Chip Rock. It might be tricky to see from this angle, but you can always find the radio towers and then look almost straight down from there. Chances are that you will see a large group of people standing to the right of it, waiting for their turns to take a photo with this famous rock. If you enjoy people watching as much as we do, you will really enjoy hanging out at the rock for a little bit. For some people, going out on the rocks seemed like it was the scariest thing that they had ever done. For others, it was a chance to goof around and do some gymnastic maneuvers.
The easiest way that to get onto Potato Chip rock was to go around to the back of the boulder behind it and climb up from there. Then, you can jump down on top of Potato Chip rock. The view from the top is very pretty so be sure to soak it in for a second after you get your obligatory Instagram picture. If you are trying to get your entire group in the photo, there’s always someone that is nice enough to do a photo trade. I guess that’s one plus to it being so crowded. When you are ready to come down, we found it much easier to work your way slowly down the crack between the two rocks. If you aren’t the sure-footed type, it may be best to have someone standing at the bottom to guide you down and grab your feet as needed.
As we made our way back down, we saw 2 guys hiking up the trail with picks and shovels. We thought they were just props for a funny photo, but we didn’t realize that they were actually the creators/maintainers of the trail. When you think of epic hiking trails, you think of many things such as the gorgeous views, the exhausting switchbacks, or the serenity of the outdoors. One thing you may not think of is the countless hours of maintenance involved in keeping these trails awesome.
On our way down the mountain, we actually got to talk to Ted, one of the guys responsible for maintaining this trail. We were amazed to learn that they are up there doing trail maintenance at least once a week! If that doesn’t amaze you, consider the fact that they have put in the work for the last 27 years. It’s no wonder why this trail is in such great shape! Please help them and their mission by keeping the trails clean and stay on the trail.
It is an out and back trail, so you will go down the exact way that you came up. The hardest part of the way down is that last little sneaky uphill that we mentioned earlier. You are so used to going downhill and tired that the last little incline seems tougher than it should be. After that little hill, you are pretty much home free! Some people may complain because this trail is so popular that it can be crowded at times, But we always have a lot of fun every time we go. The Potato Chip rock has definitely not seen the last of us!
Don’t forget to check out Three Sister Falls hike for another cool hike in the San Diego area.
Happy Adventuring. Don’t forget to follow us on Instagram, subscribe to our Youtube channel, and sign up for our newsletter!
RECOMMEND GEAR:
Don’t forget to check out our Recommended Gear section as well.
• Sunscreen:
We use eco-friendly, reef safe sunscreen. Alba Botanica Hawaiian Sunscreen or Sun Bum Sunscreen
• Good traction hiking shoes:
It is a moderate to difficult hikes with lots of boulders and stairs so good hiking shoes are definitely recommended. Vy’s shoes are North Face
• Water
We can’t stress enough! Bring more water than you think you need for this trail. It gets very warm.Vy uses the Camelback L.U.X.E. Dustin uses the Clik Small pack (sadly Clik is no longer around).
• Lunch and snacks
It is a long hike. Snacks are good for that extra fuel. There are also a few pretty spots up there for a quick lunch stop as
CAMERA GEAR:
• Camera:
Sony a7 III
• Lenses:
Sony 24 -70mm f/2.8 Carl Zeiss Vario Sonnar T Zoom Lens